1Before You Start — Phone Settings
Do this once when you install the app, so you never miss a ride request.
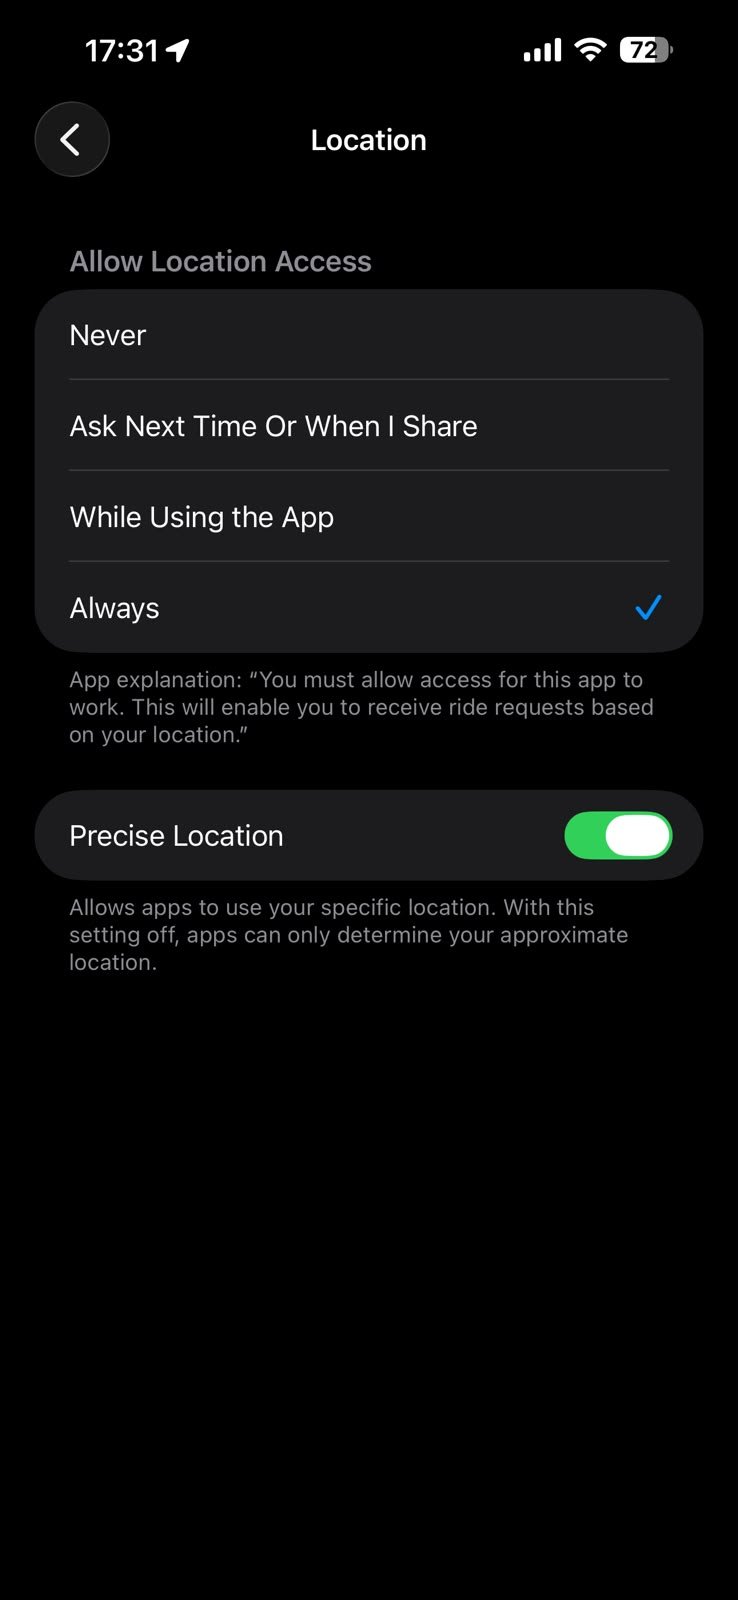 Location → Always
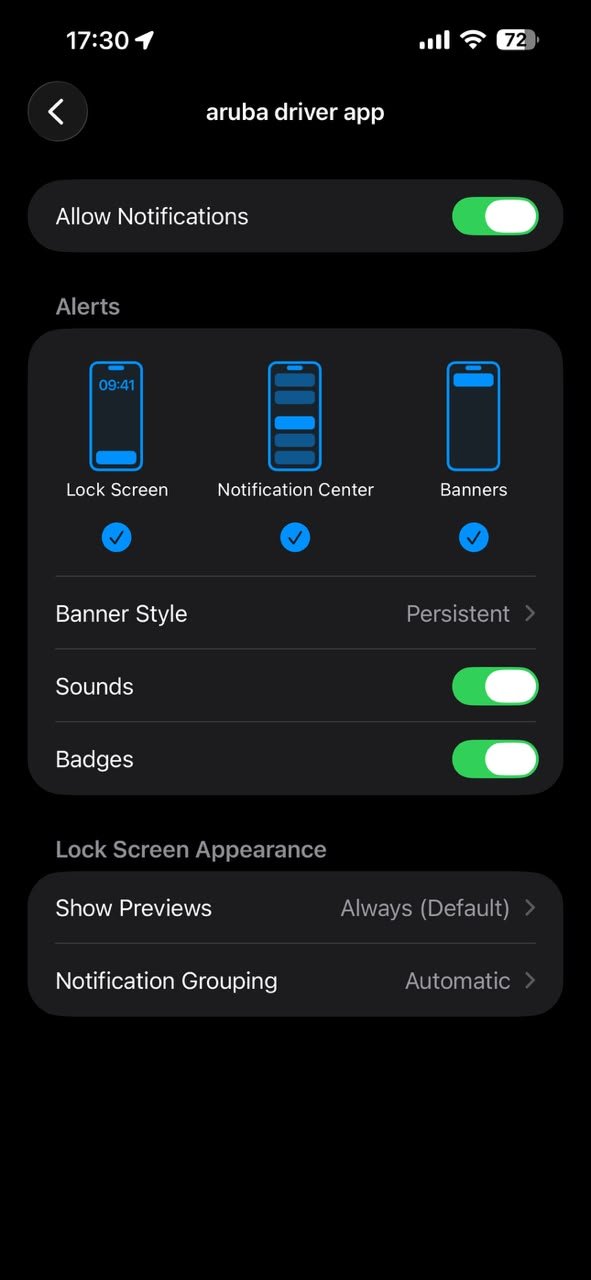 Notifications → all ON
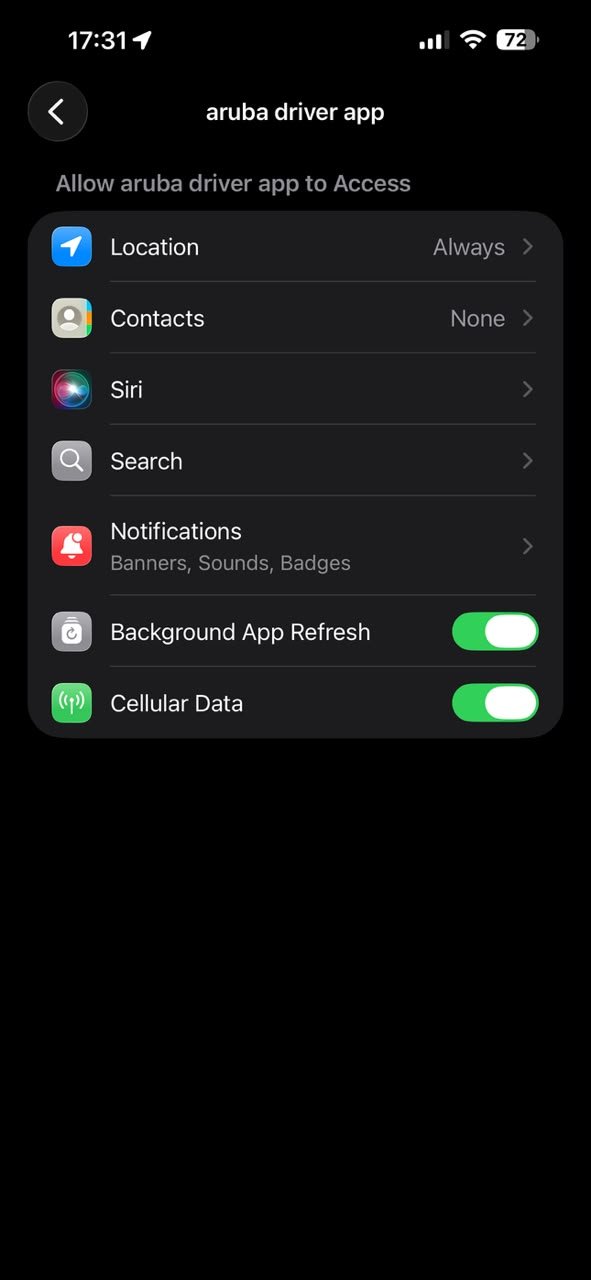 Background App Refresh & Cellular Data → ON
- Go to iPhone Settings → Apps → aruba driver app
- Tap Location and set it to Always — not "While Using". If it's not on Always, the app can't send you ride requests properly.
- Tap Notifications and make sure Allow Notifications, Sounds, and Badges are all turned ON.
- While in Notifications, set Banner Style to "Persistent". This keeps the ride request visible on screen until you deal with it, instead of disappearing after a few seconds.
- Make sure Background App Refresh and Cellular Data are turned ON for the app.
2Going Online / Offline
This is the switch that decides whether you receive ride requests.
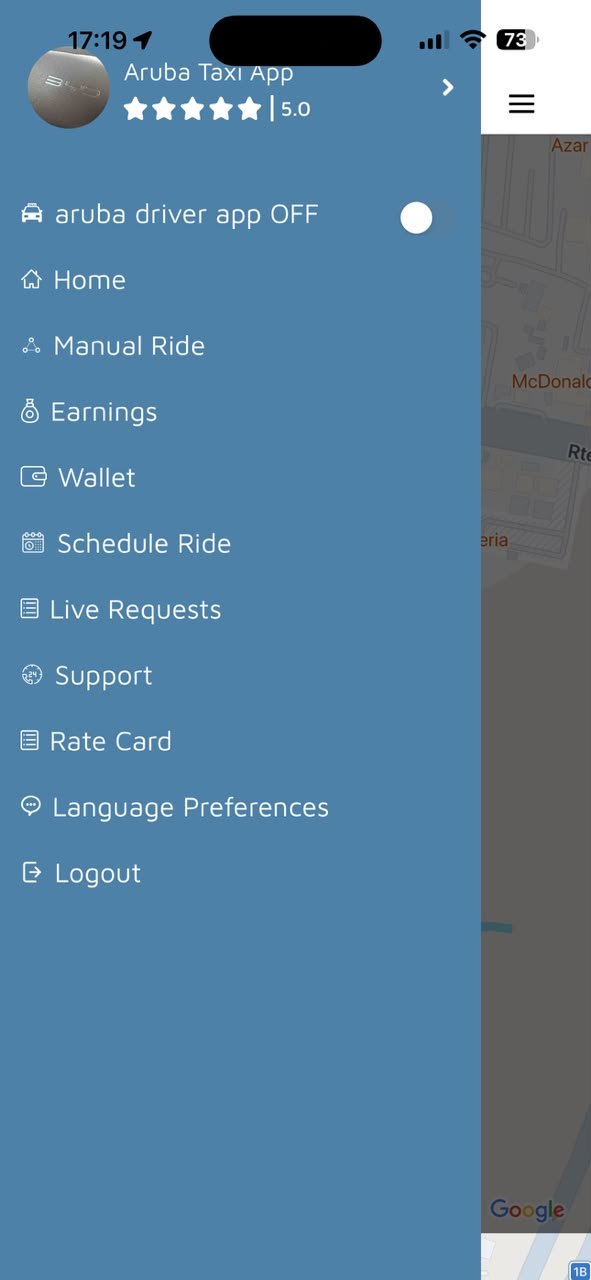 Menu — app OFF
 Menu — app ON
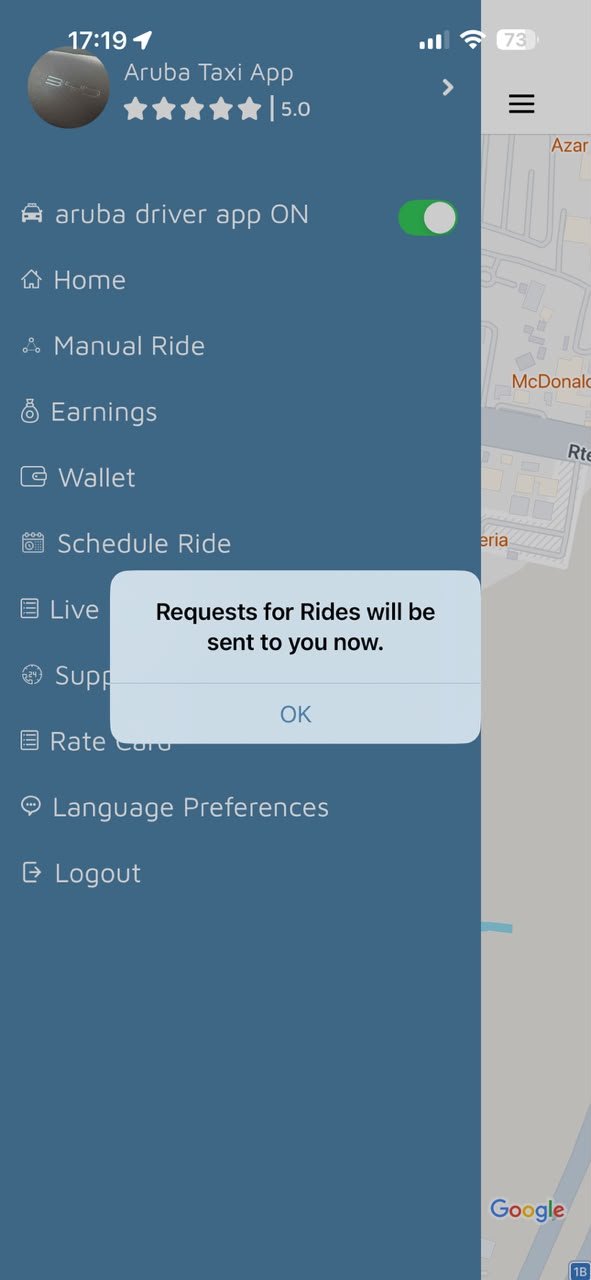
- Tap the ☰ menu icon (top left) to open the side menu.
- At the top you'll see "aruba driver app ON / OFF" with a green switch.
- Turn it ON to start receiving ride requests. You'll see a message: "Requests for Rides will be sent to you now."
- Turn it OFF anytime you want to stop getting requests (break, end of shift, etc). The map will show "aruba driver app OFF" so you know you're not visible to riders.
3Receiving a Ride Request
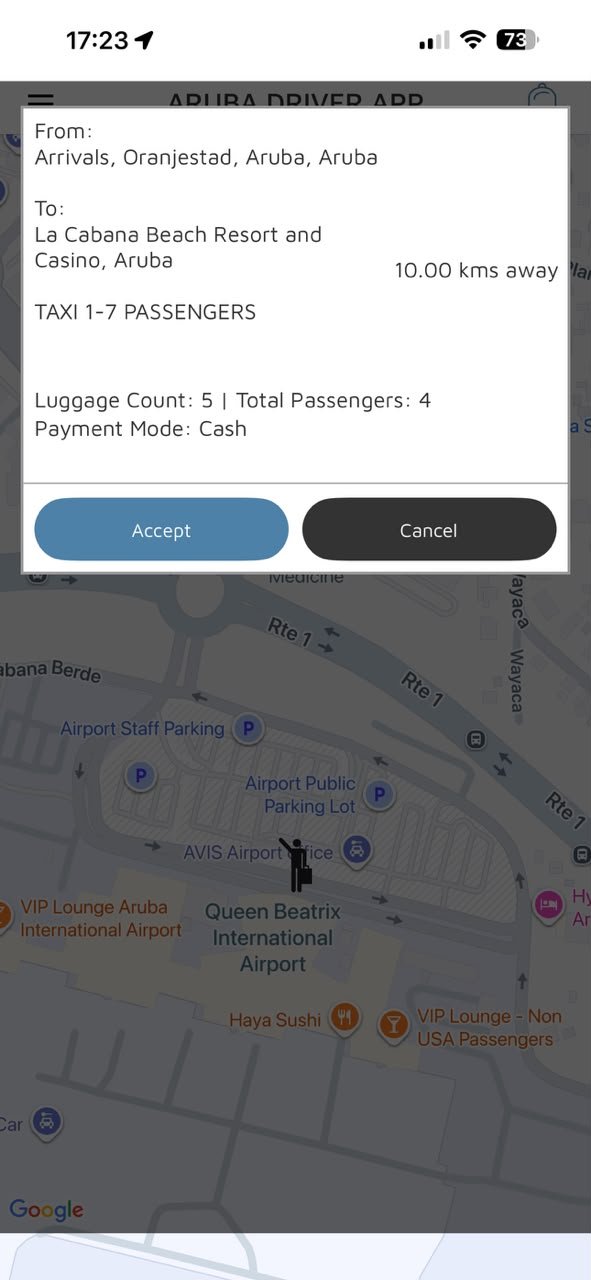
When online, a request will pop up automatically with the trip details.
 Incoming request
- The popup shows: pickup and drop-off location, distance away, luggage count, number of passengers, and payment mode (Cash or Online/Card).
- Tap Accept to take the ride, or Cancel to pass on it.
4Driving to Pickup & Starting the Ride
 On the way — route/message/call
 Arrived — Start Ride
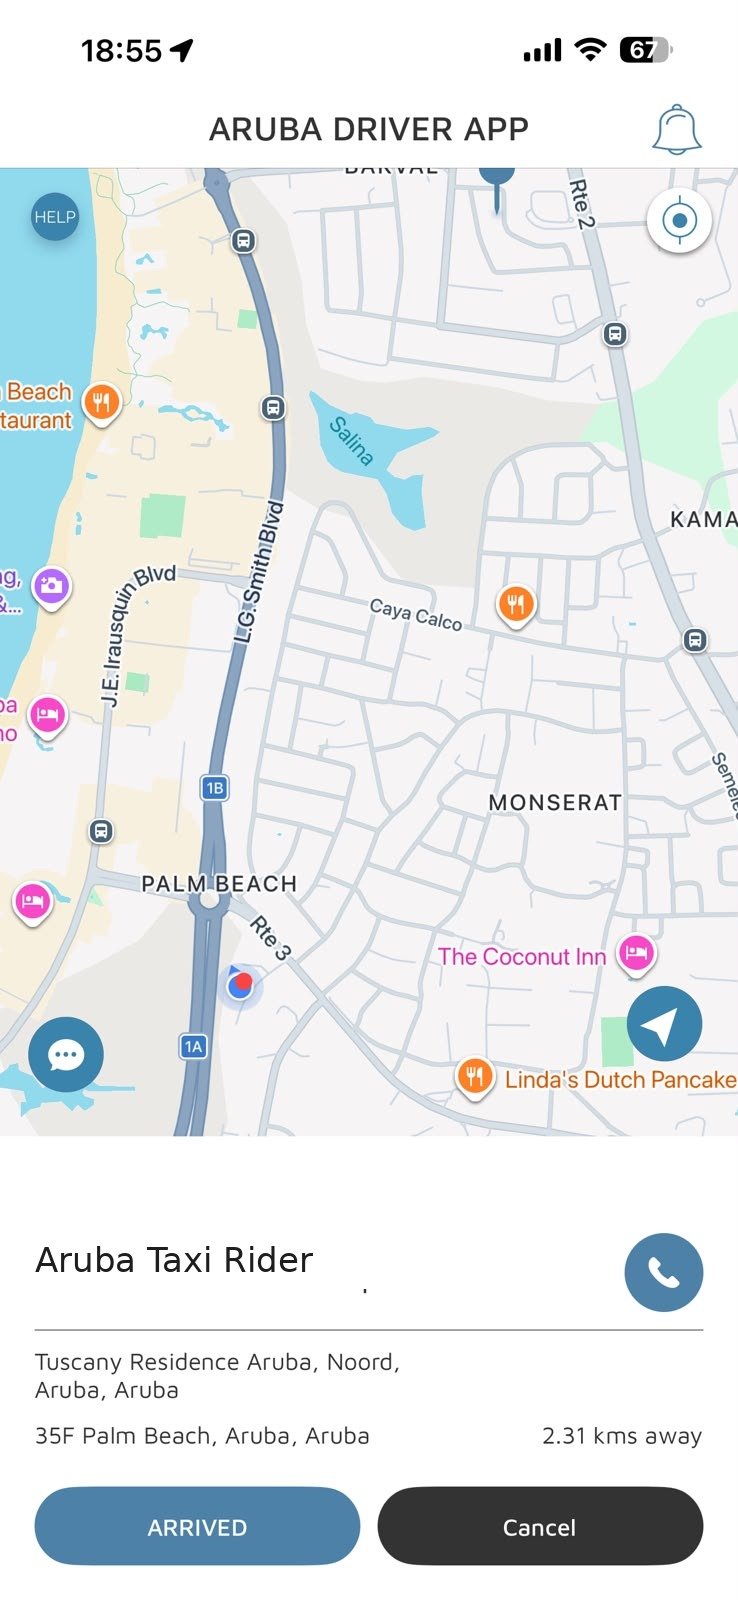
- Once you accept, the app gives you directions to the pickup location.
- Tap the navigation arrow icon (bottom right) to open turn-by-turn routing in your phone's own maps app.
- Tap the speech bubble icon (bottom left) to message the passenger, or the phone icon next to their name to call them — both go through your own phone.
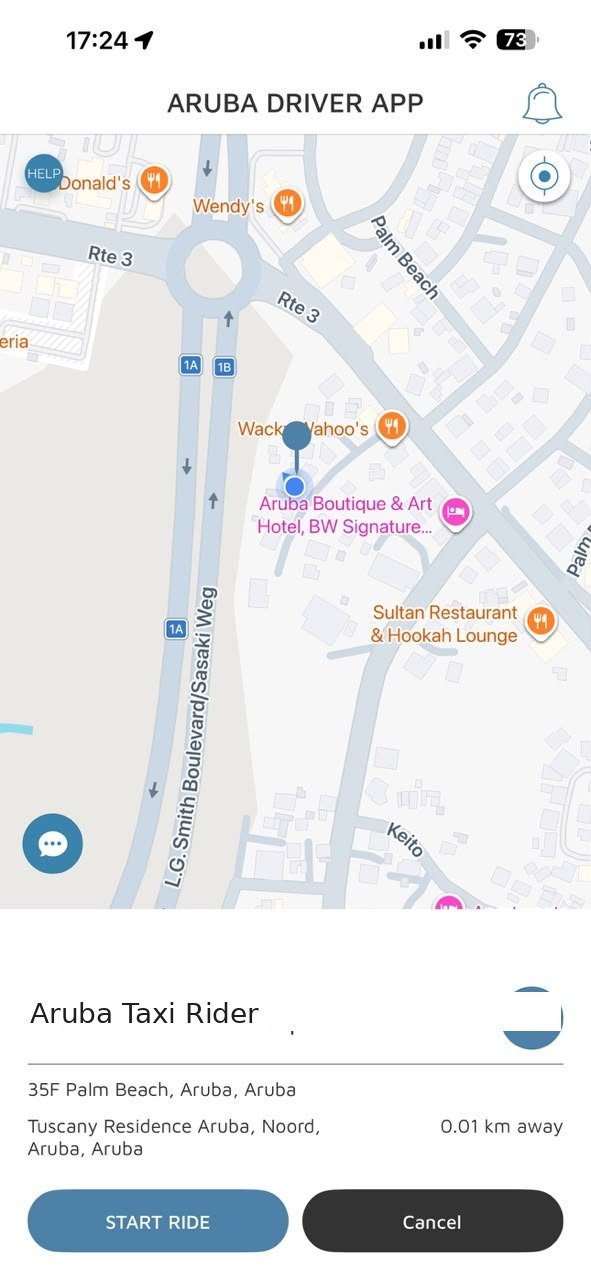
- As you get close, the app automatically updates to show you've arrived.
- When the passenger is in the car, tap START RIDE to begin the trip.
5Ending the Ride
This is where you enter the fare from your taxi meter.
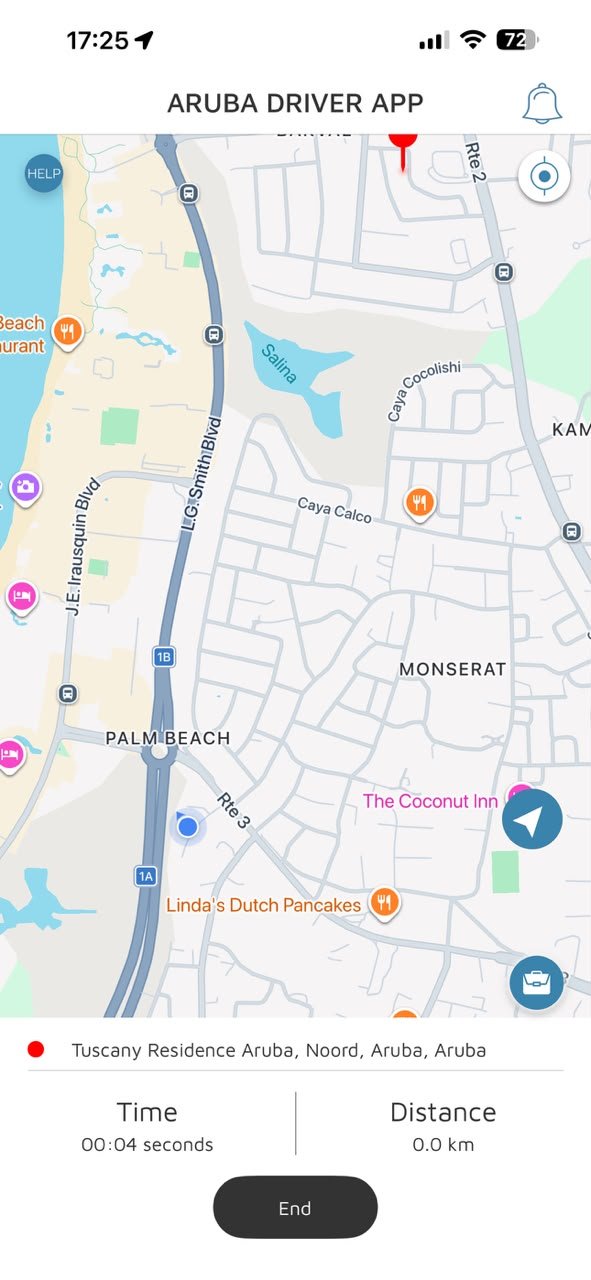 Tap End when trip is done
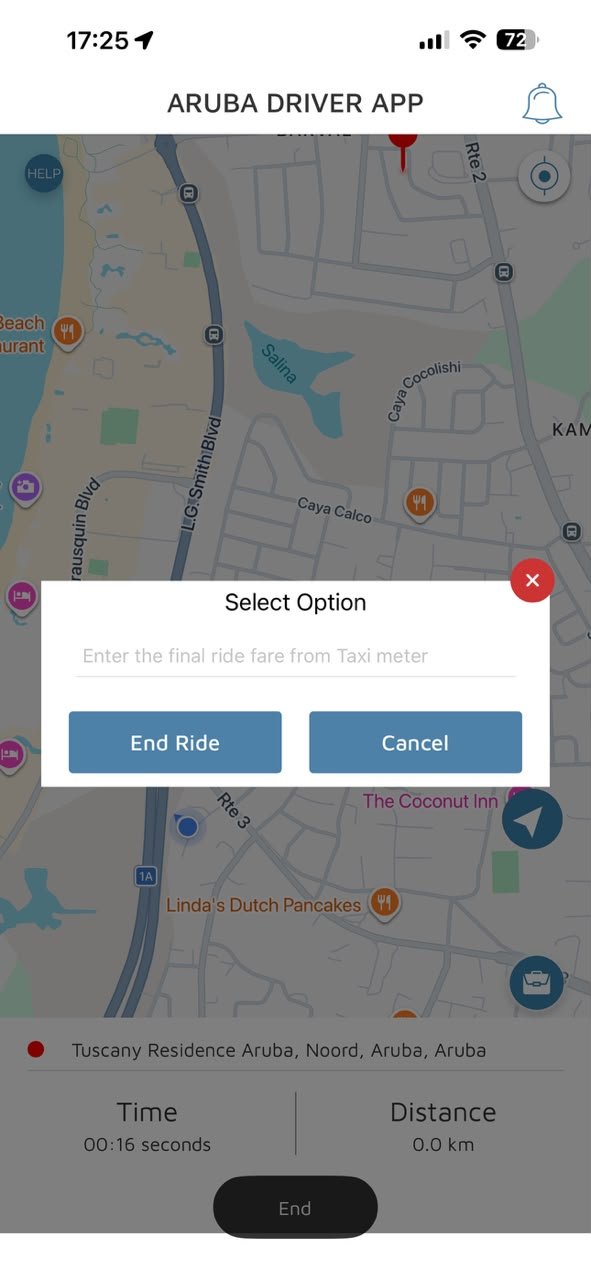 Tap End
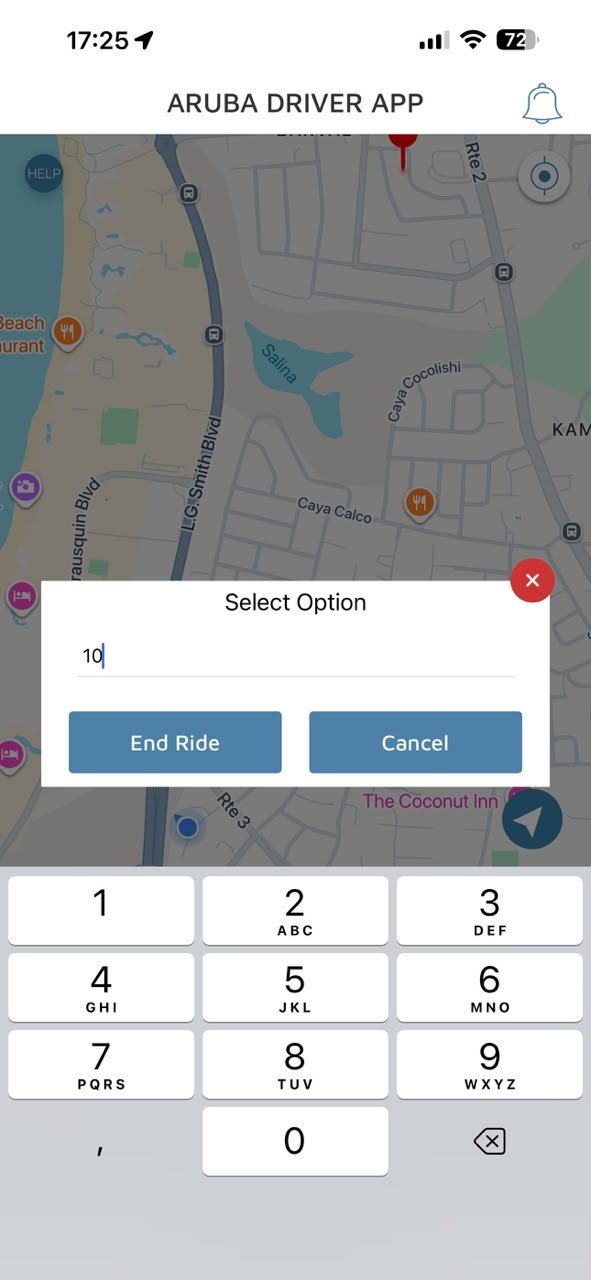 Enter meter fare
- When you drop the passenger off, tap End at the bottom of the screen.
- A box will pop up asking for the final ride fare. Type in the fare you're charging for the ride.
- Tap End Ride to confirm.
6Payment — Cash vs Card
After you end the ride, the invoice screen tells you exactly how the passenger paid. Read this carefully every time.
🟦 "TAKE CASH $__"
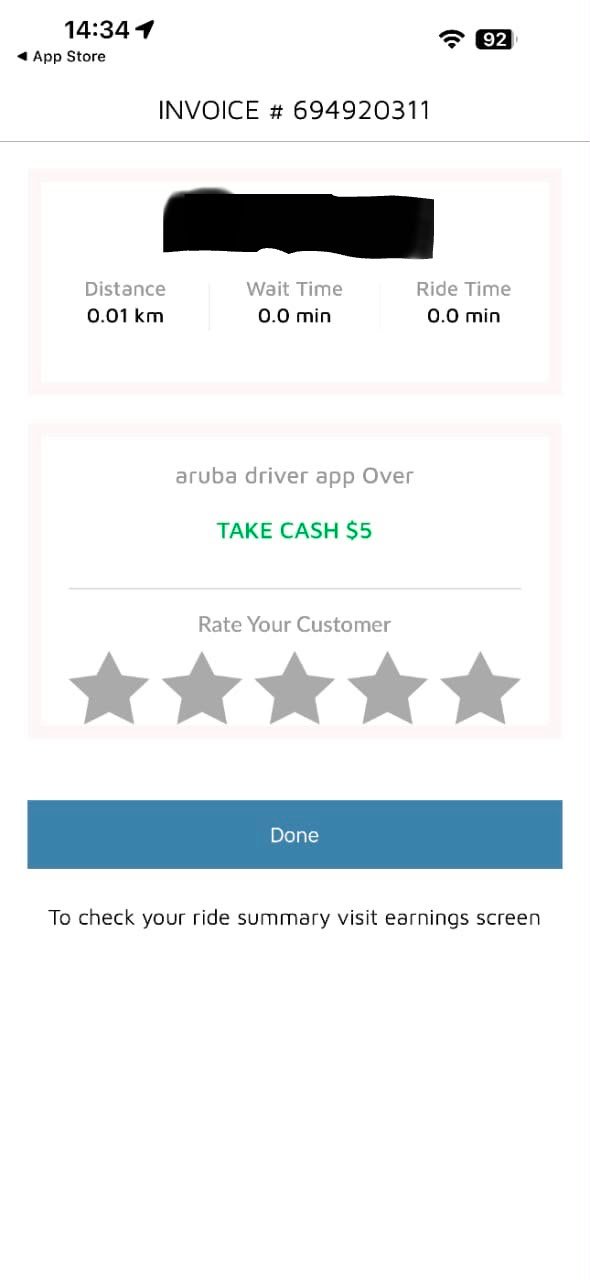
The passenger has not paid online. Collect this exact cash amount from them before they leave.
🟩 "Paid with card $__"
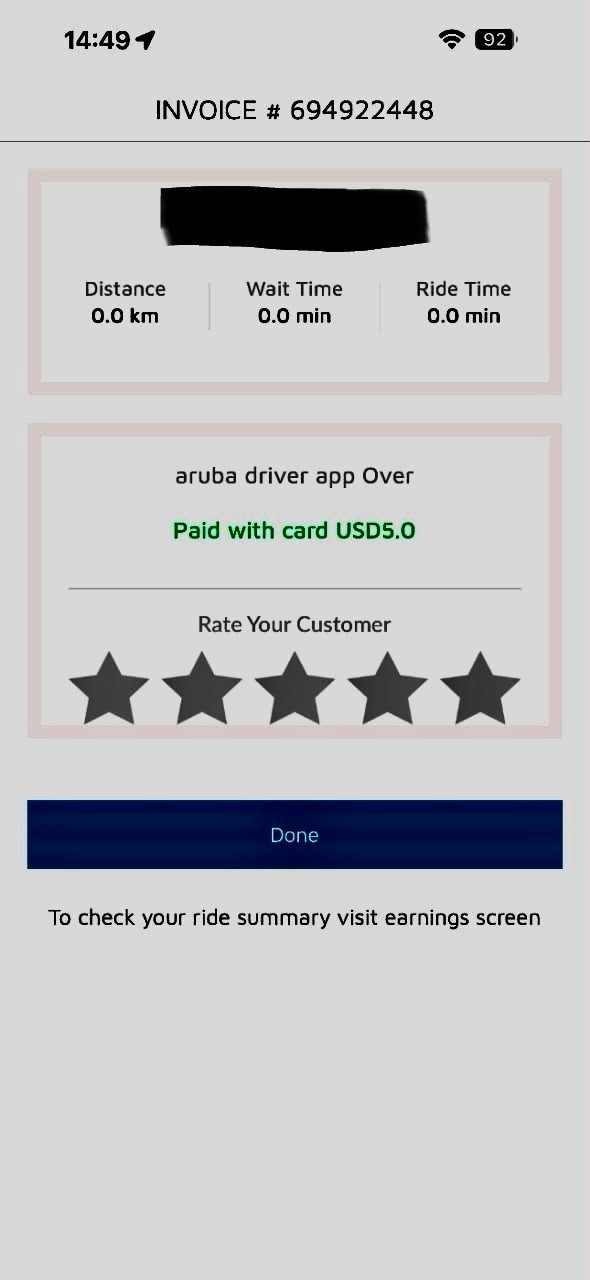
Payment already went through online. You don't need to collect anything from the passenger.
- Collect the fare in cash from the passenger, or
- Use our backup payment link: pay.arubataxiapp.com to charge them by card yourself.
- Rate your passenger using the stars before tapping Done.
7Wallet
Where you check your current balance and past transactions.
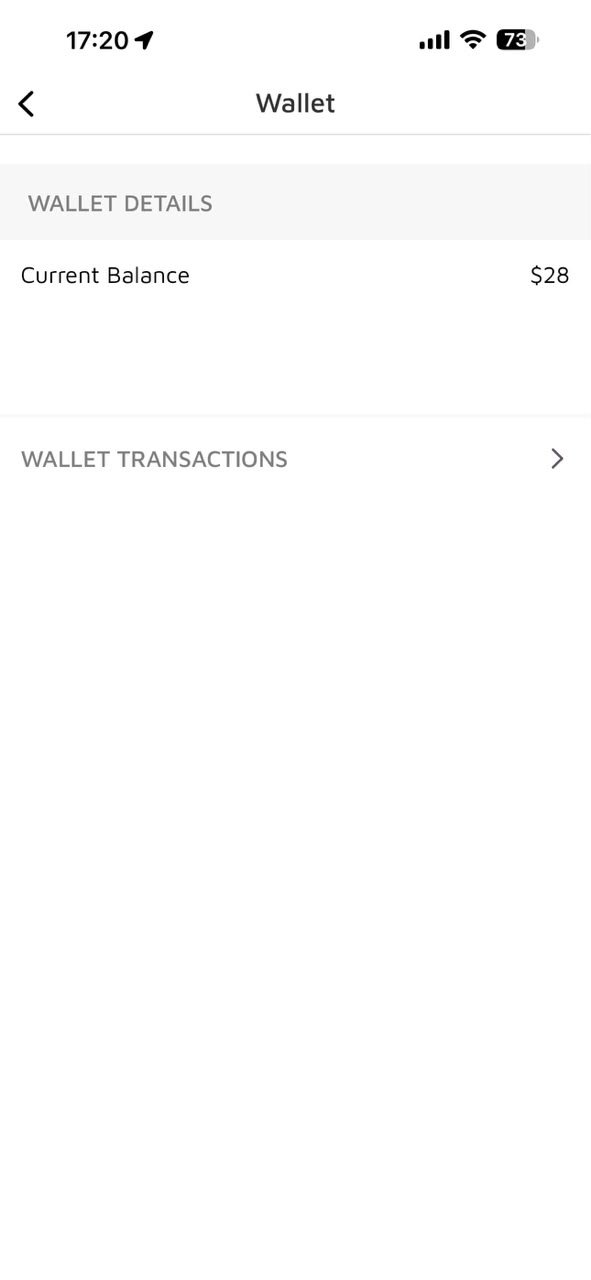 Wallet balance
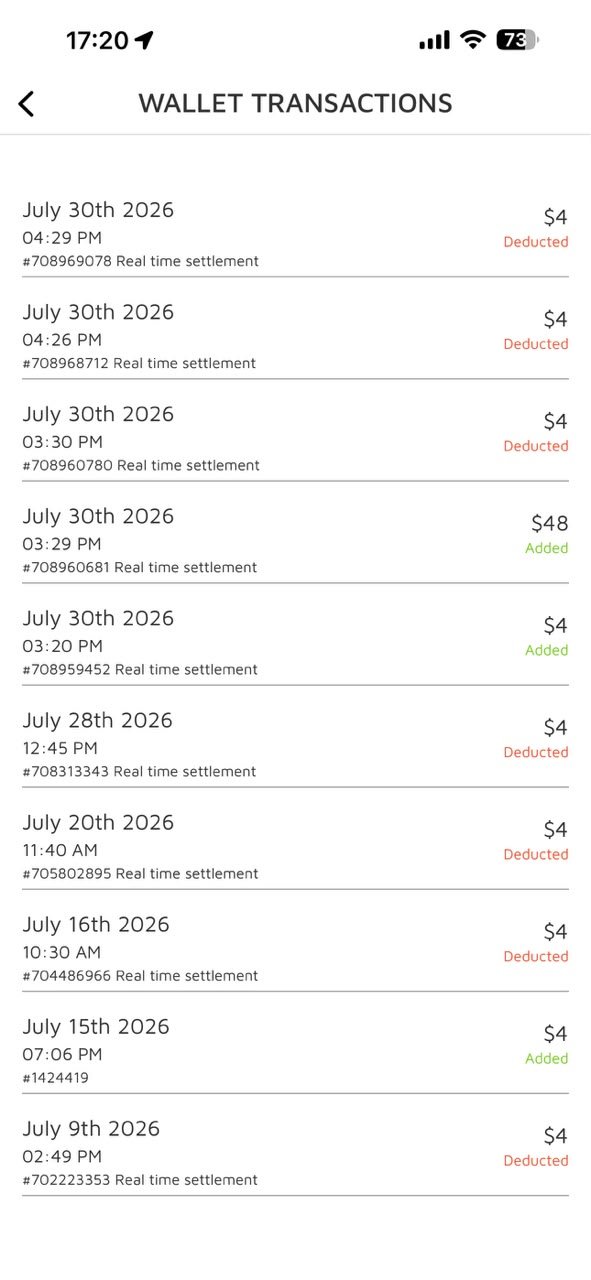 Wallet transactions
- Open the menu → Wallet to see your current balance.
- Tap Wallet Transactions to see a list of amounts added or deducted, with dates and ride numbers.
8Earnings
Where you check what you've made today, this week, and per ride.
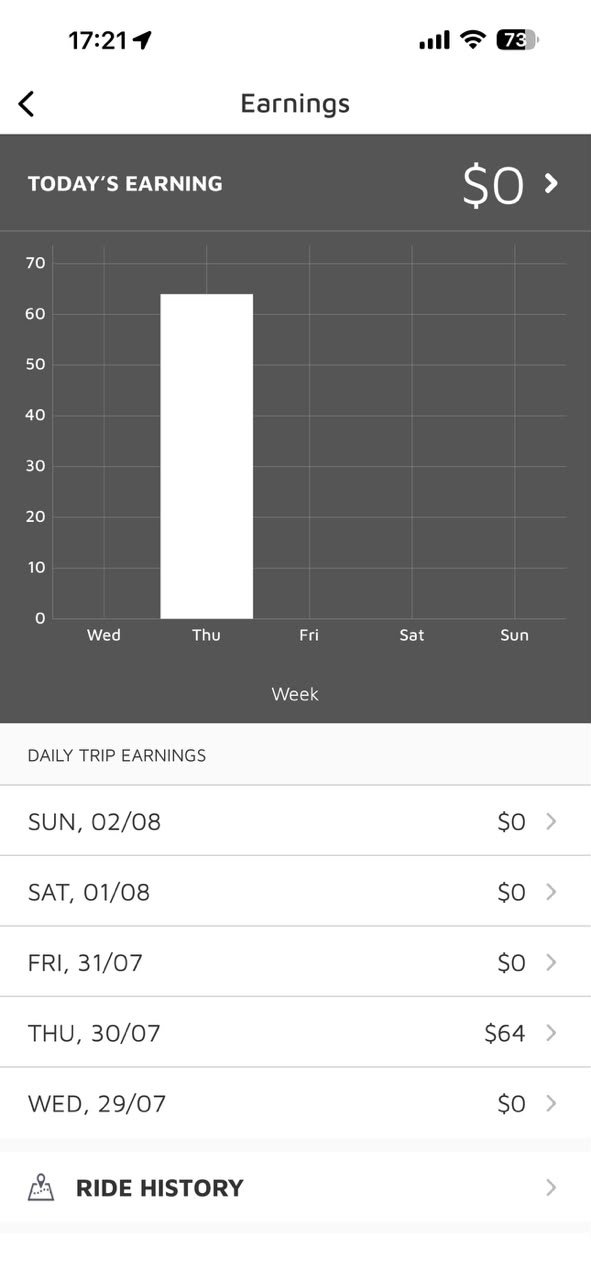 Earnings overview
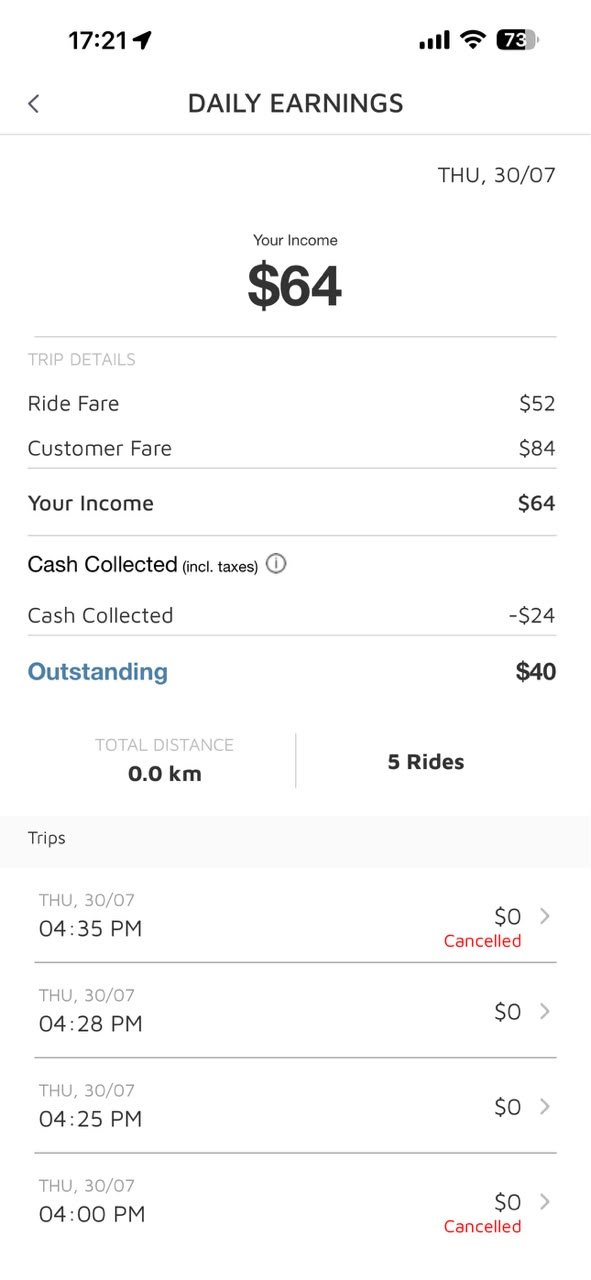 Daily breakdown
- Open the menu → Earnings to see today's total and a chart of the past week.
- Tap on any day to see a breakdown of that day's rides, or tap into a single ride for its trip details.
9Profile & Service Type
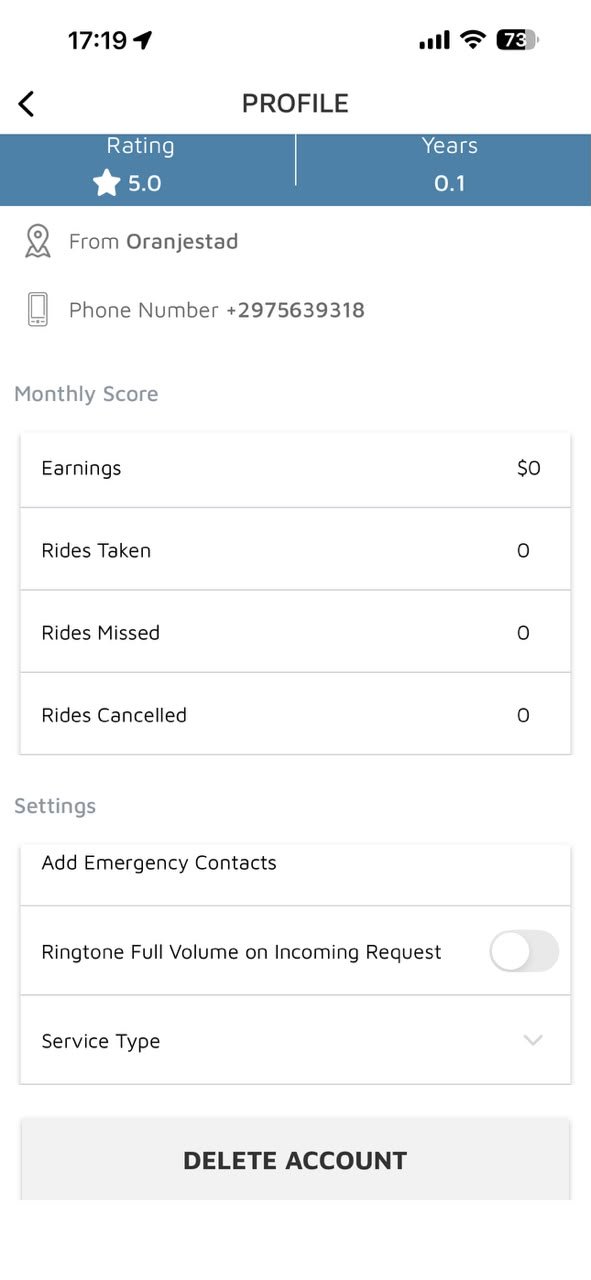 Profile
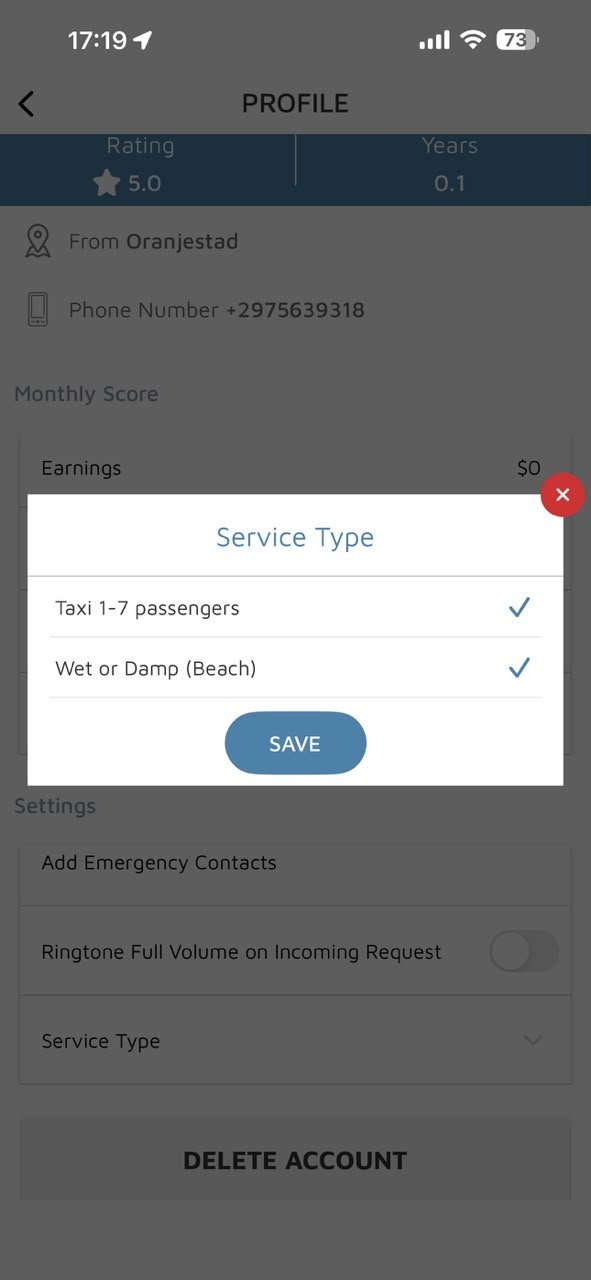 Service Type
- Open the menu → your name/photo at the top to see your Profile: rating, monthly earnings, rides taken/missed/cancelled.
- "Ringtone Full Volume on Incoming Request" — when this is ON, the ride request sound plays at full volume even if your phone is on silent or turned down. Toggle it on or off here depending on what you prefer.
- Under Service Type, make sure the correct box(es) are checked for the type of trips you can take (e.g. Taxi 1-7 Passengers, Wet or Damp/Beach), then tap Save.
10Scheduled Rides
Rides booked in advance work a little differently from normal live requests.
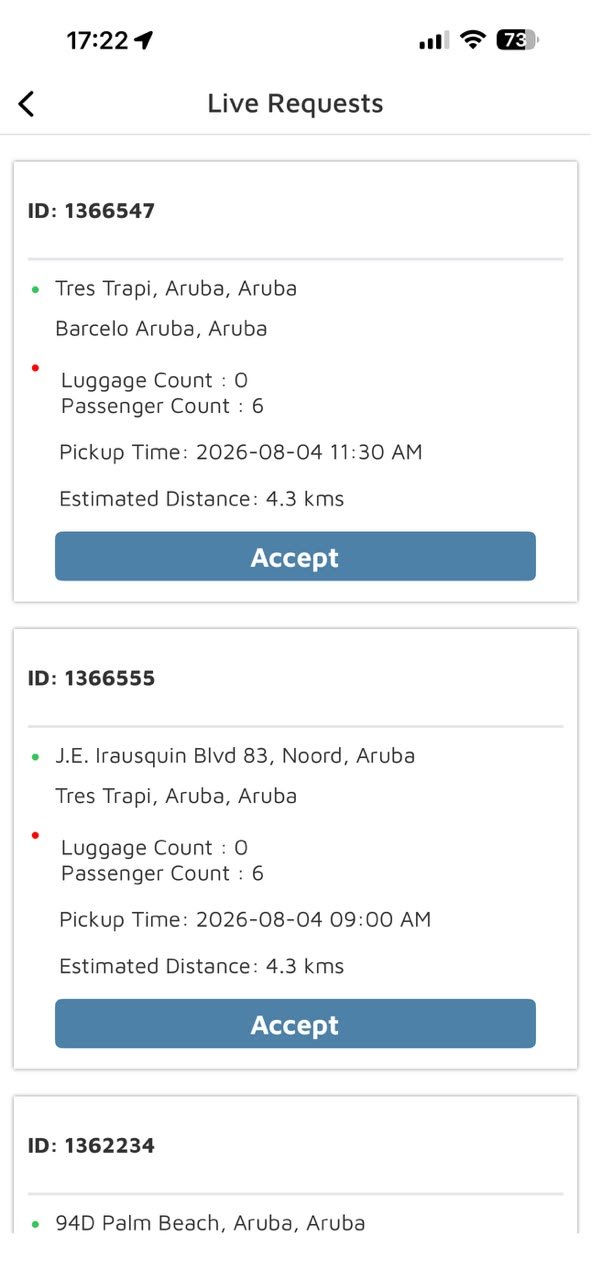 Live Requests — scheduled rides
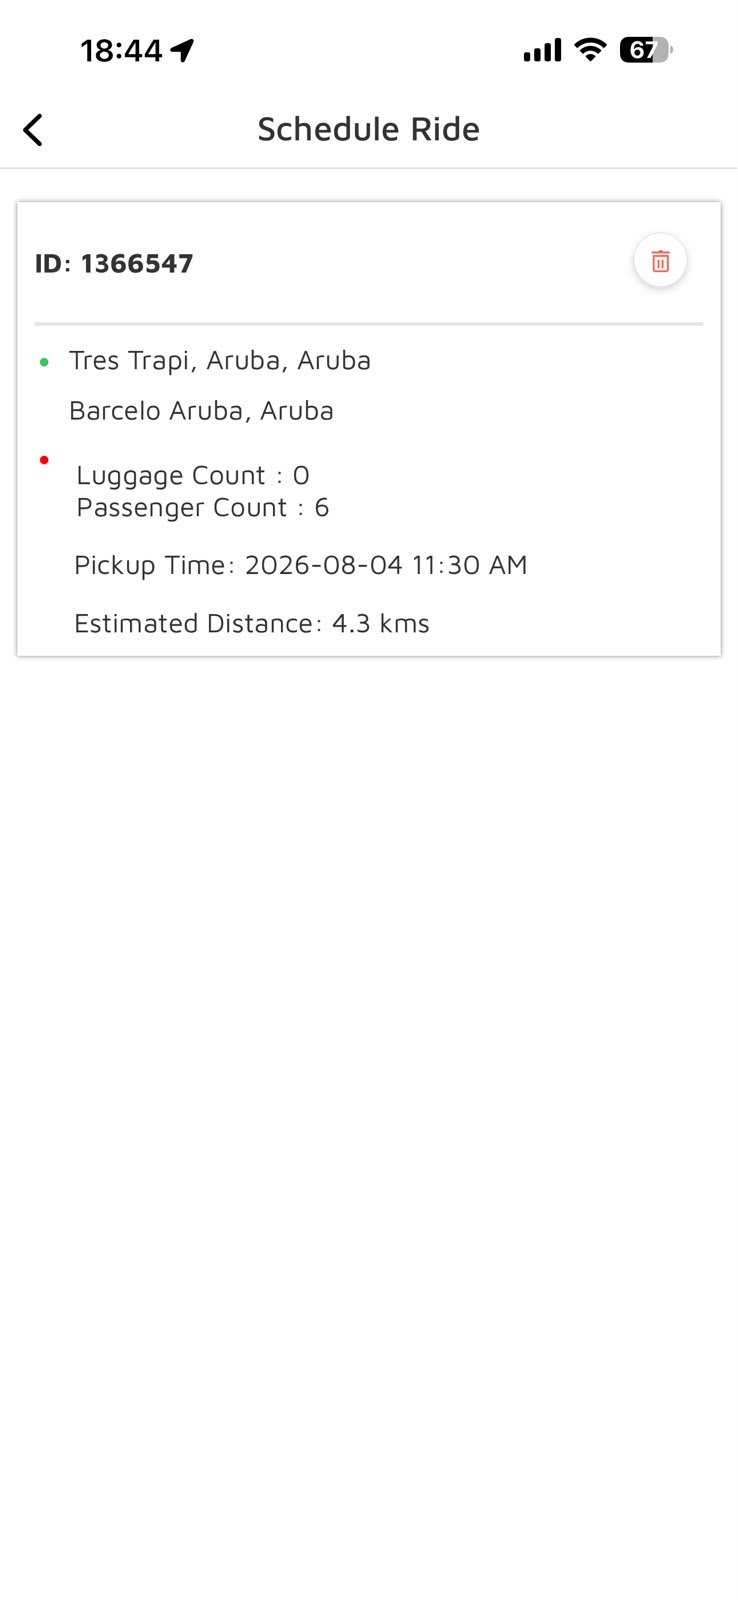 Schedule Ride tab — after accepting
- Open the menu → Live Requests to see upcoming pre-booked trips, each showing a pickup time, pickup/drop locations, passenger and luggage count.
- Tap Accept on any trip you want to take.
- Once accepted, it moves to your Schedule Ride tab — that's where you'll find it later, with a trash/bin icon in the top right to cancel it if needed.
- The actual ride request will only pop up on your screen 15 minutes before the scheduled pickup time — you don't need to do anything until then.
1Before You Start — Phone Settings
Do this once when you install the app, so you never miss a ride request.
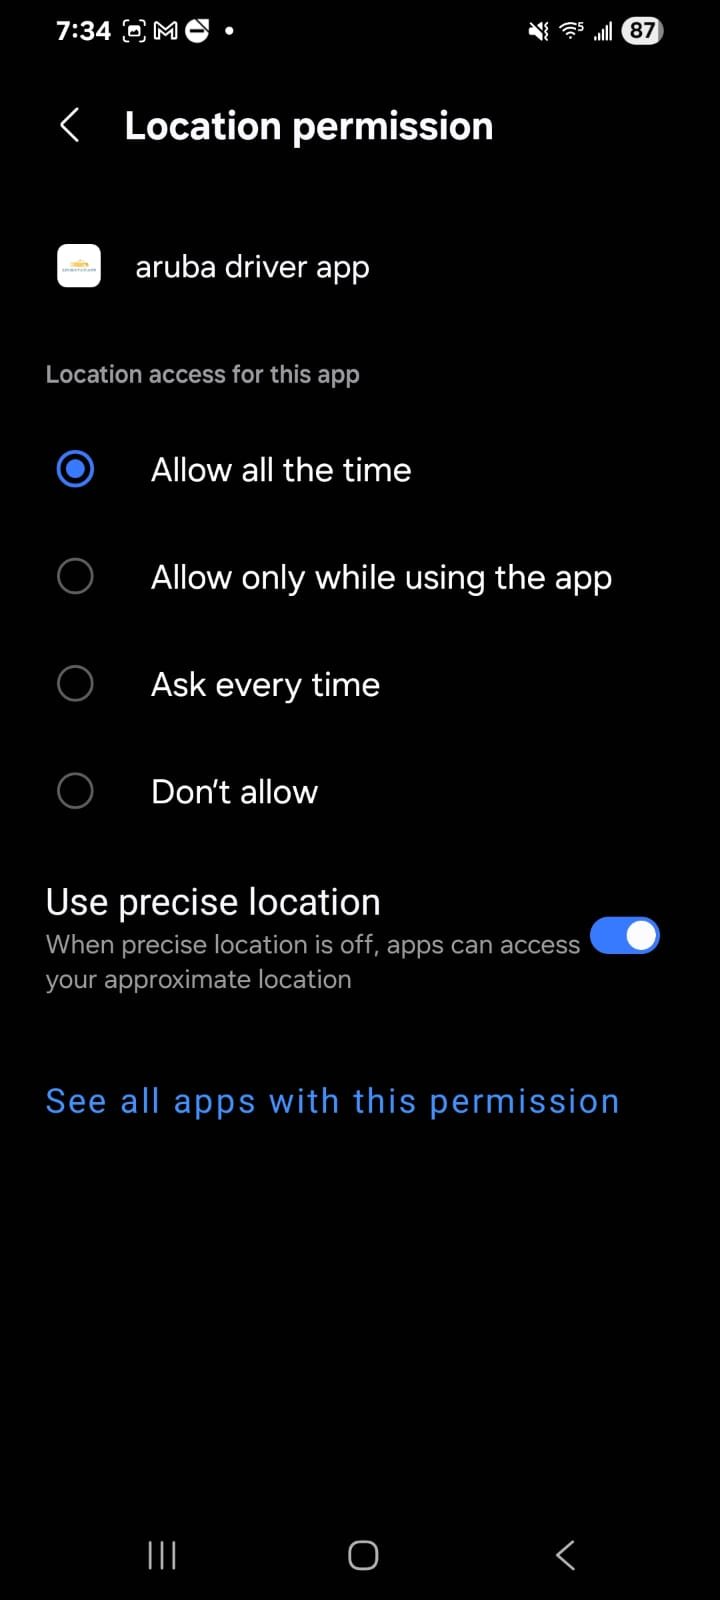 Location → Allow all the time
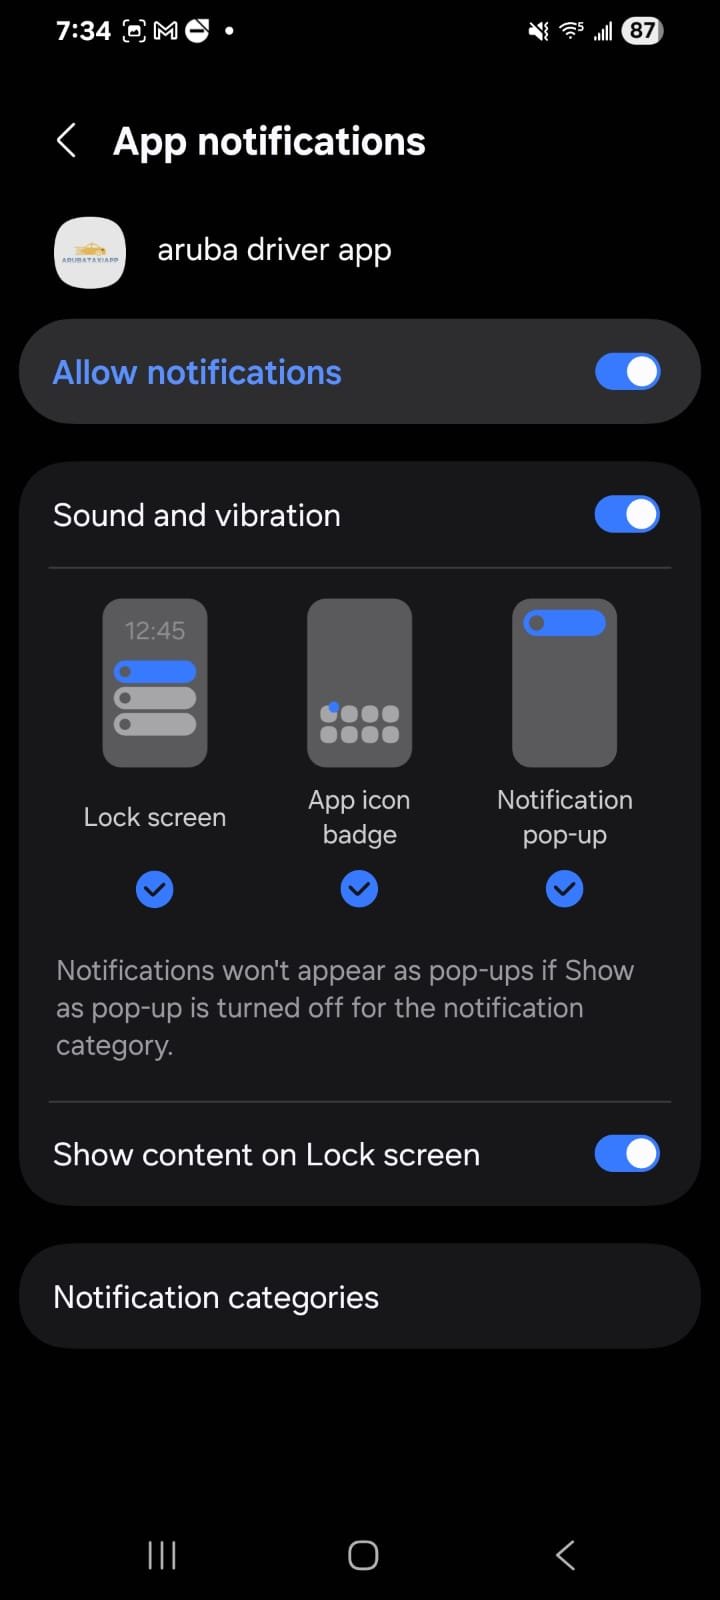 Notifications → all ON
- Go to Phone Settings → Apps → aruba driver app → Permissions → Location
- Set it to "Allow all the time" — not "Allow only while using the app". If it's not set to all the time, the app can't send you ride requests properly.
- Go to Phone Settings → Apps → aruba driver app → Notifications and make sure Allow notifications and Sound and vibration are both turned ON.
- Make sure Lock screen, App icon badge, and Notification pop-up are all checked, so a request always shows up clearly.
2Going Online / Offline
This is the switch that decides whether you receive ride requests. On Android there are two ways to do this.
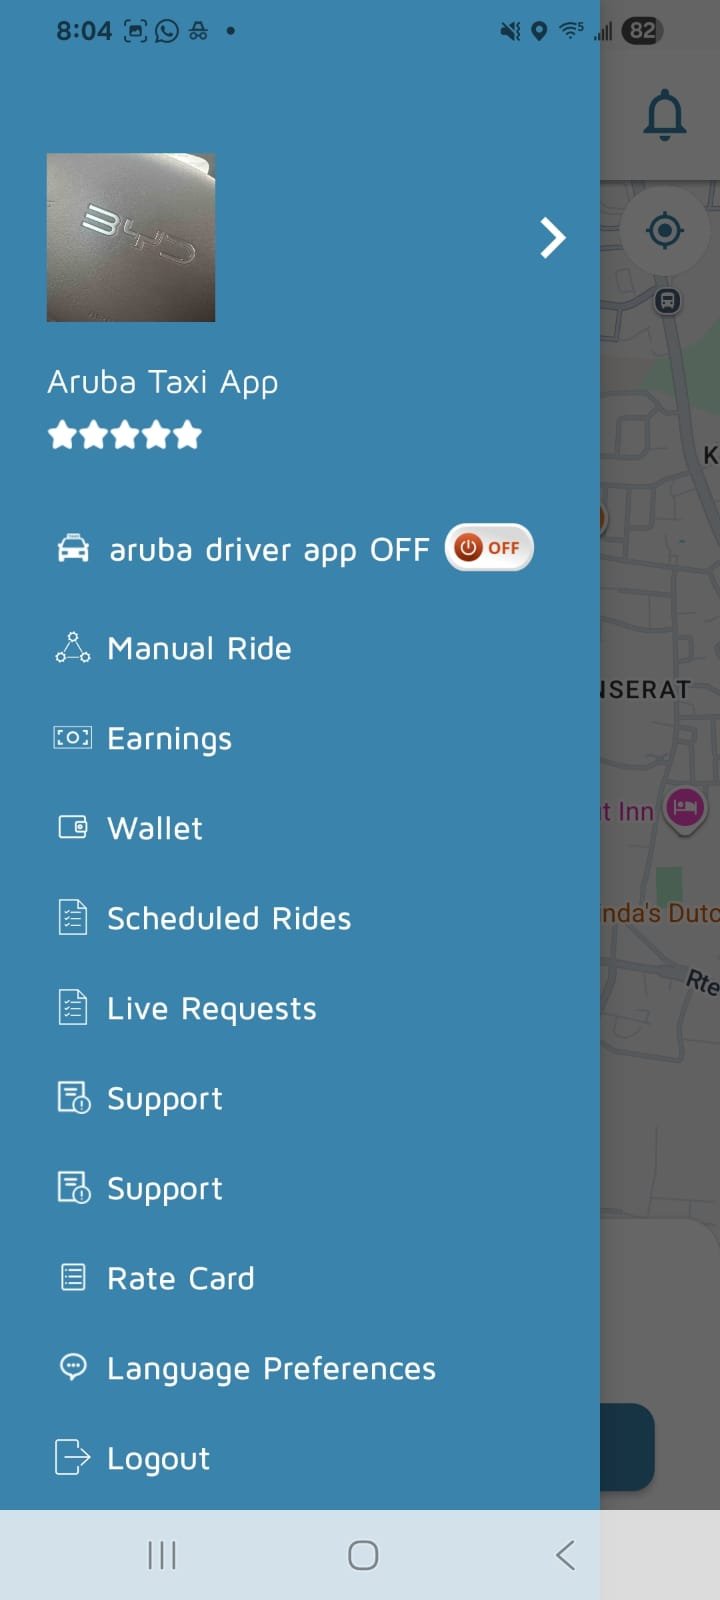 Menu — app OFF
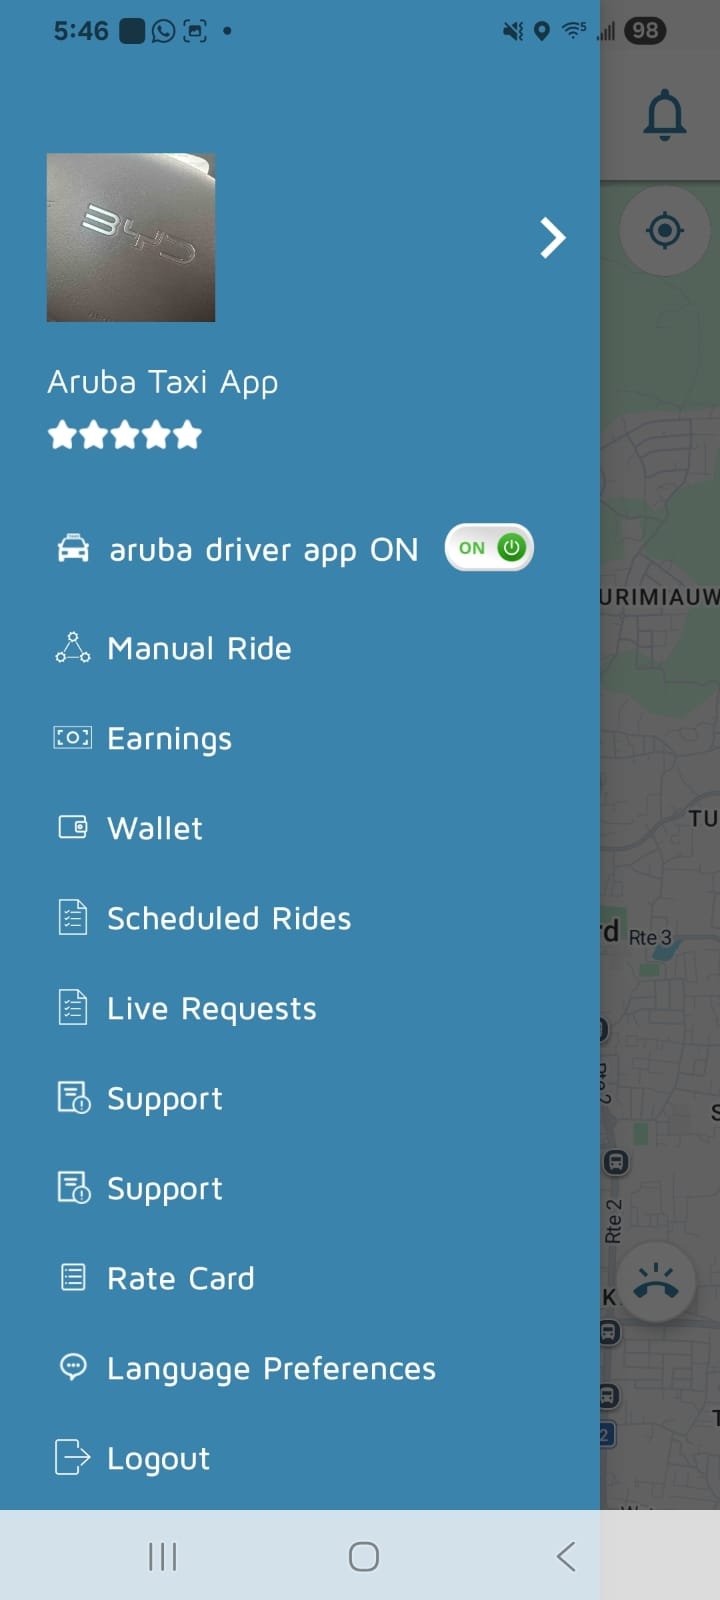 Menu — app ON
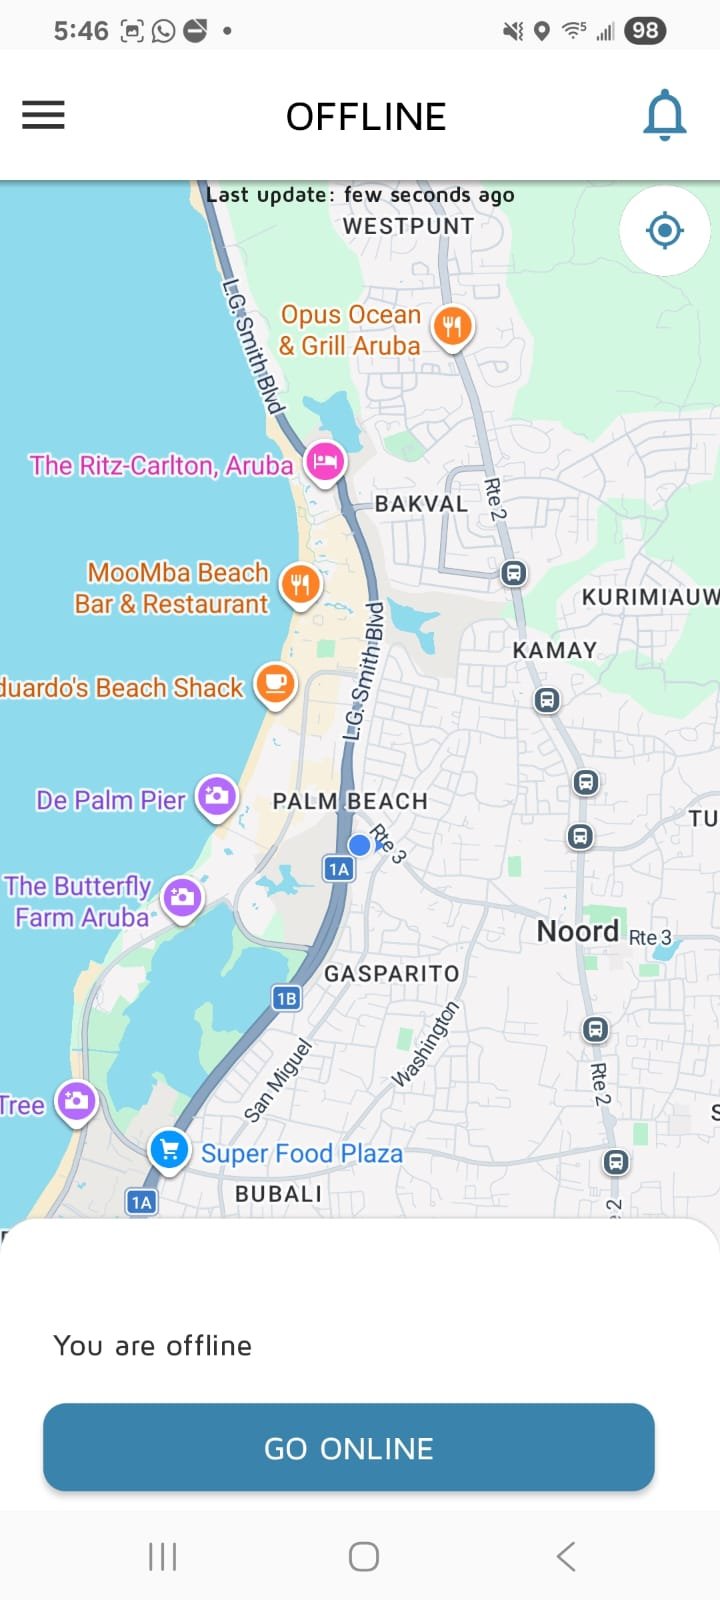 Or use "GO ONLINE" on the map
- Tap the ☰ menu icon (top left) to open the side menu.
- At the top you'll see "aruba driver app ON / OFF" with a toggle switch. Tap it to switch between online and offline.
- Android only: when you're offline, the main map screen also shows a "GO ONLINE" button at the bottom — you can tap that directly instead of going through the menu.
3Receiving a Ride Request
When online, a request will pop up automatically with the trip details.
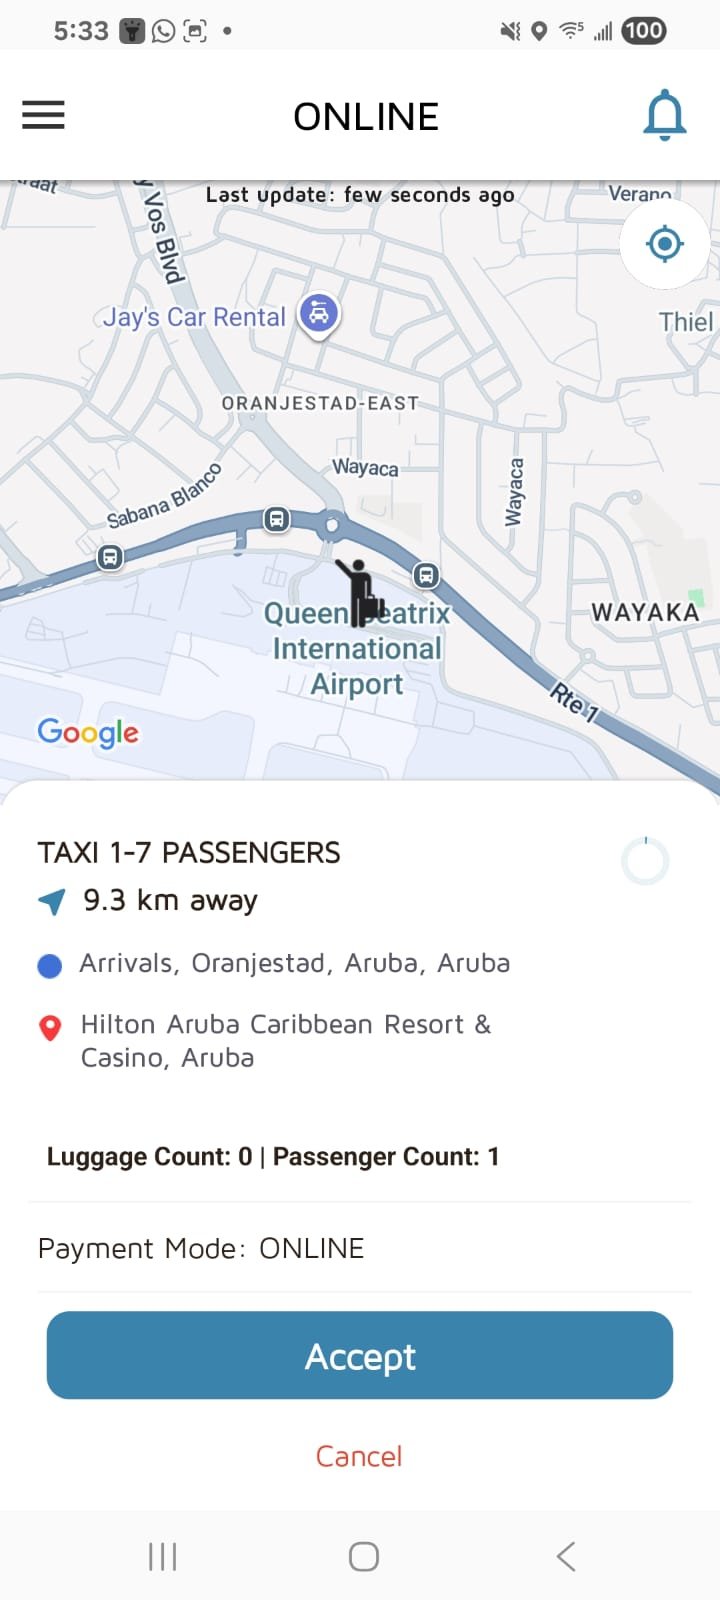 Incoming request
- The popup shows: pickup and drop-off location, distance away, luggage count, number of passengers, and payment mode (Cash or Online/Card).
- Tap Accept to take the ride, or Cancel to pass on it.
4Driving to Pickup & Starting the Ride
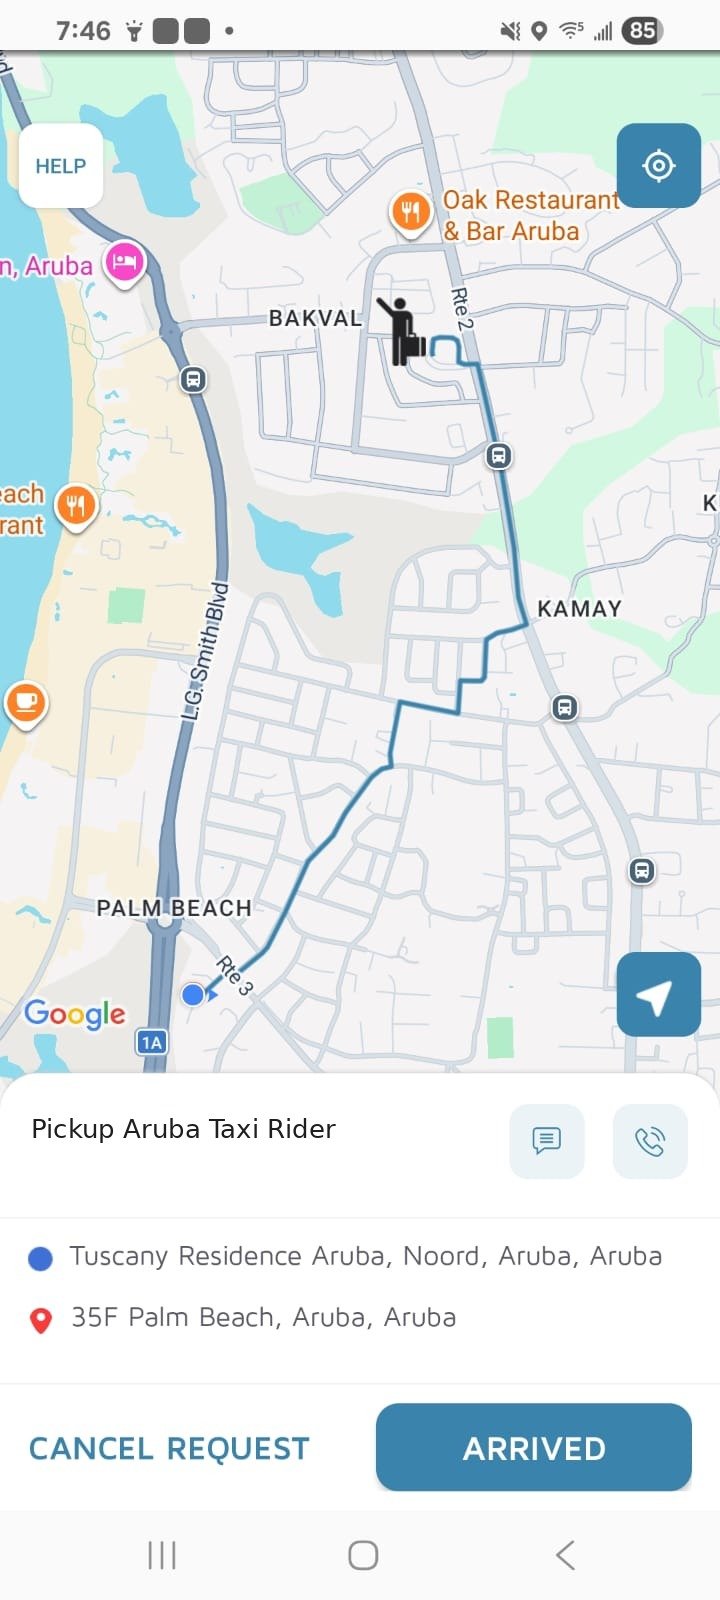 On the way — message/call the rider
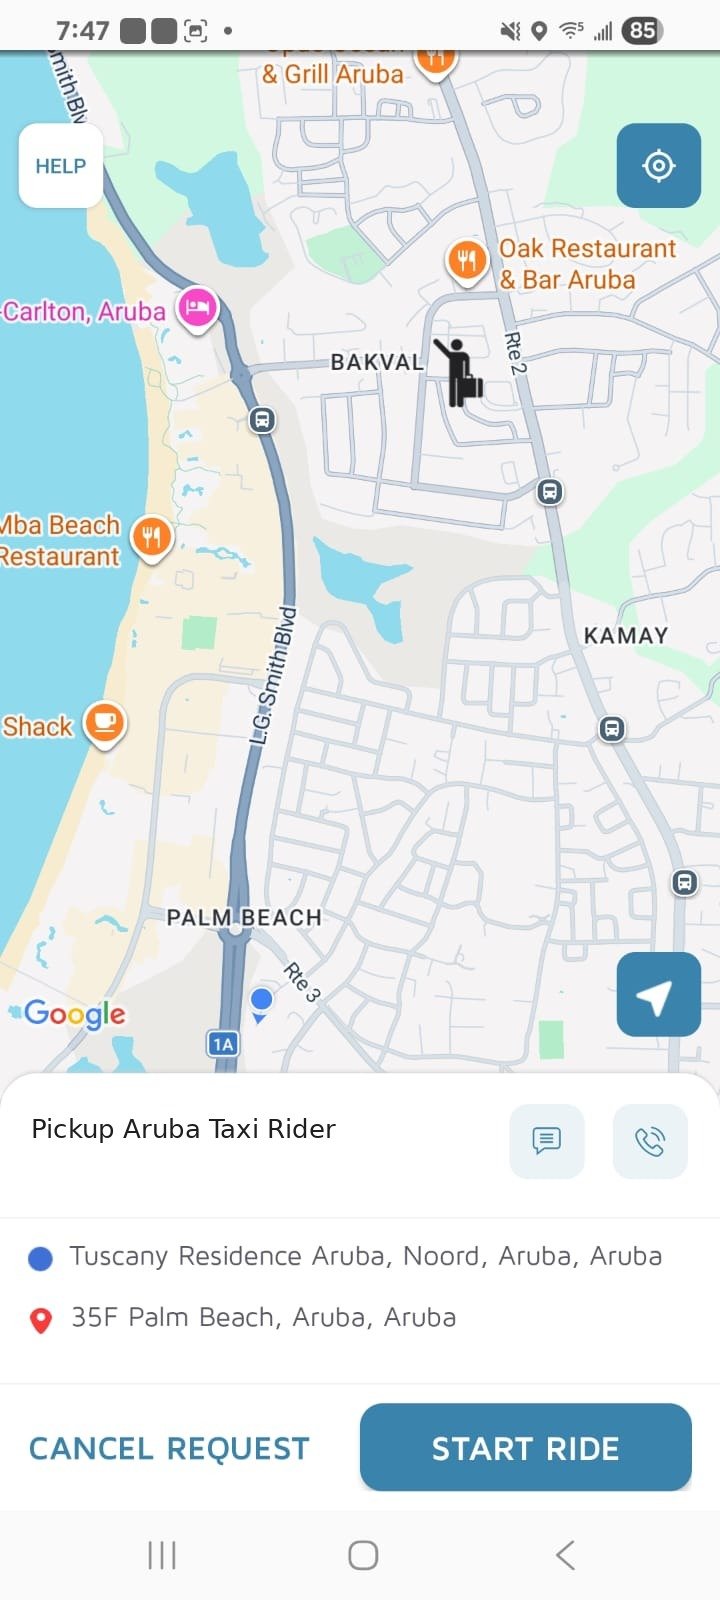 Arrived — Start Ride
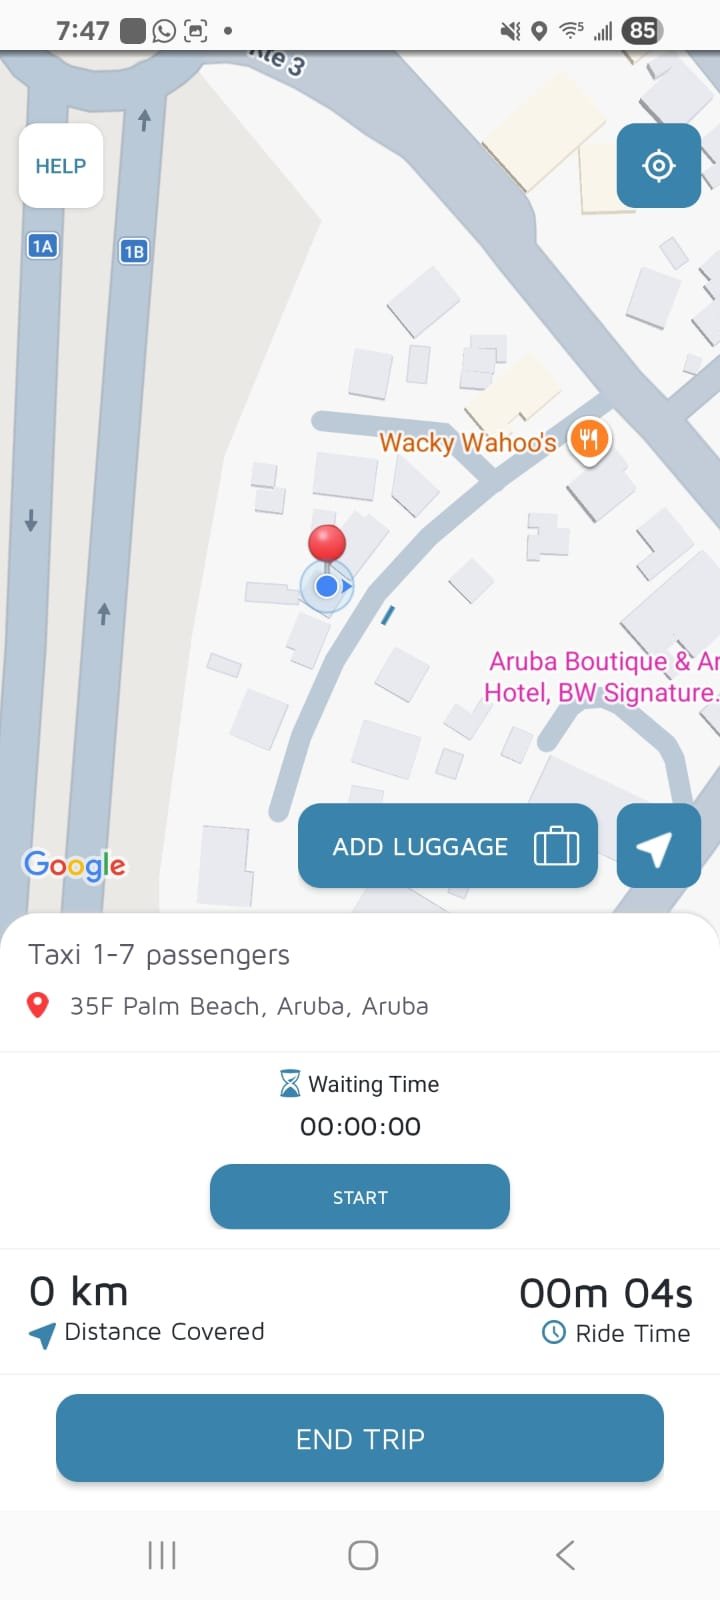 Ride in progress
- Once you accept, the app gives you directions to the pickup location.
- Tap the navigation arrow icon (bottom right) to open turn-by-turn routing.
- Tap the speech bubble icon to message the passenger, or the phone icon to call them — both go through your own phone.
- When you're at the pickup location, tap ARRIVED.
- When the passenger is in the car, tap START RIDE to begin the trip.
- During the ride, if the passenger has extra luggage, you can tap ADD LUGGAGE to record it.
5Ending the Ride
This is where you enter the fare you're charging.
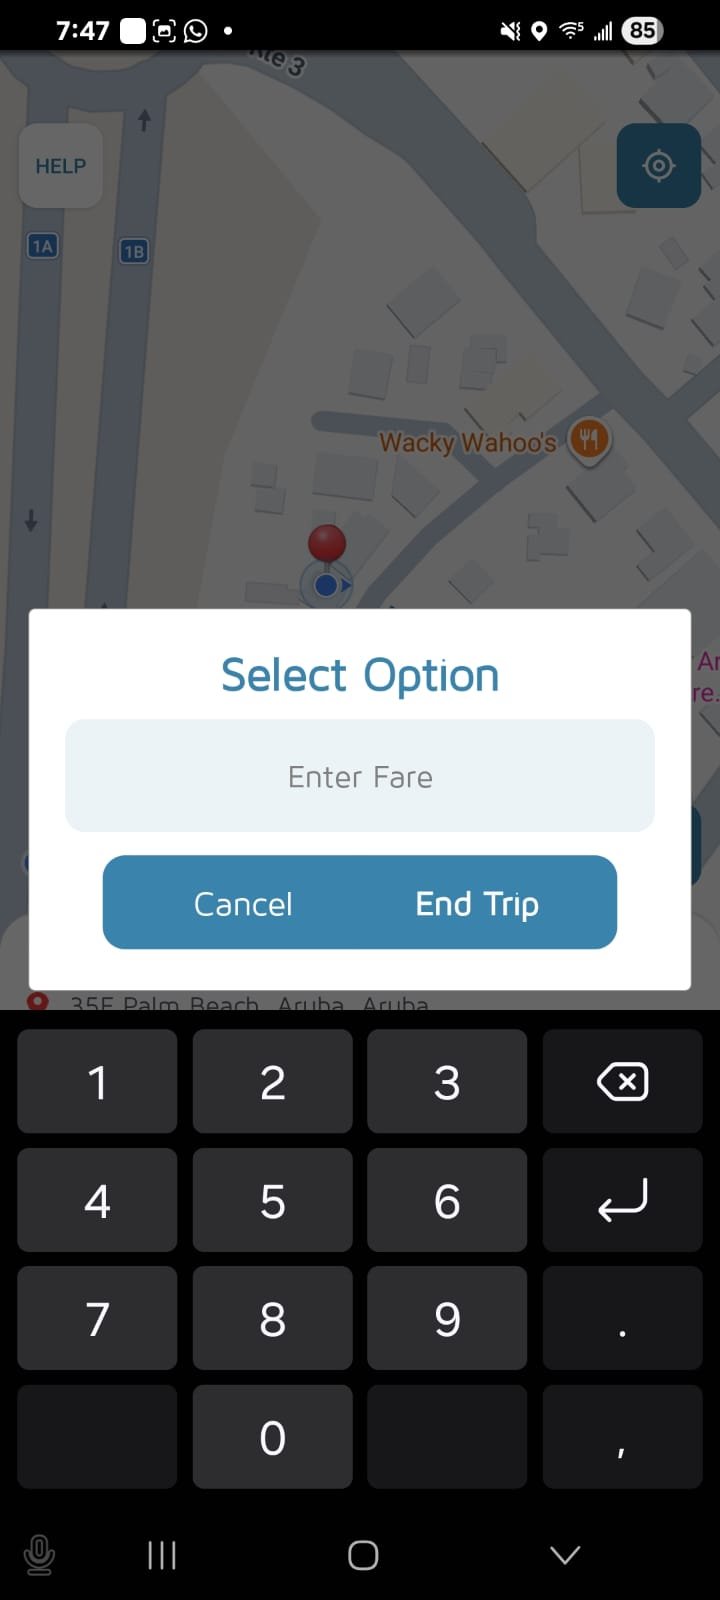 Enter fare
- When you drop the passenger off, tap END TRIP.
- A box will pop up asking for the final ride fare. Type in the fare you're charging for the ride.
- Tap End Trip to confirm.
6Payment — Cash vs Card
After you end the ride, the invoice screen tells you exactly how the passenger paid. Read this carefully every time.
🟦 "Please Collect Cash $__"
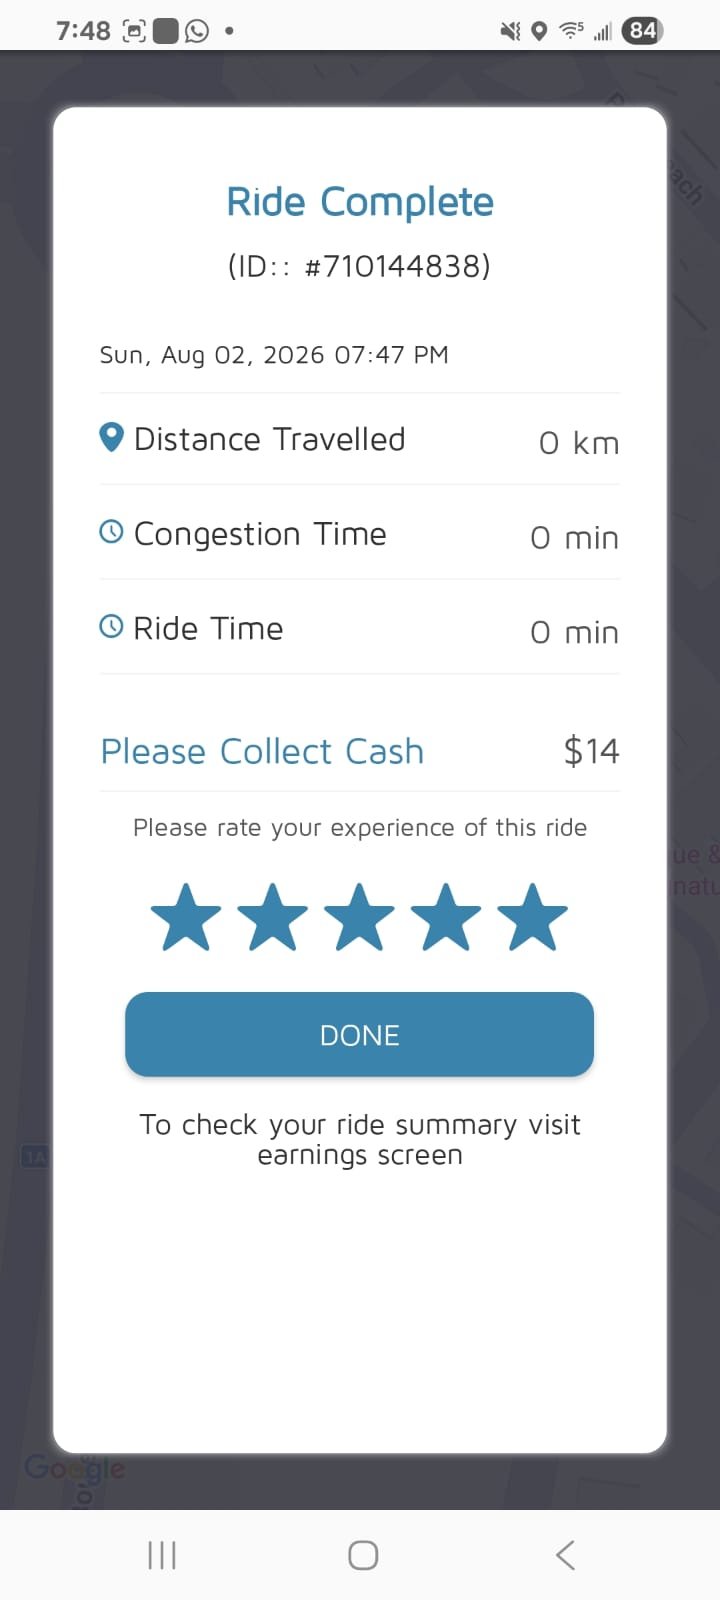
The passenger has not paid online. Collect this exact cash amount from them before they leave.
🟩 Paid online
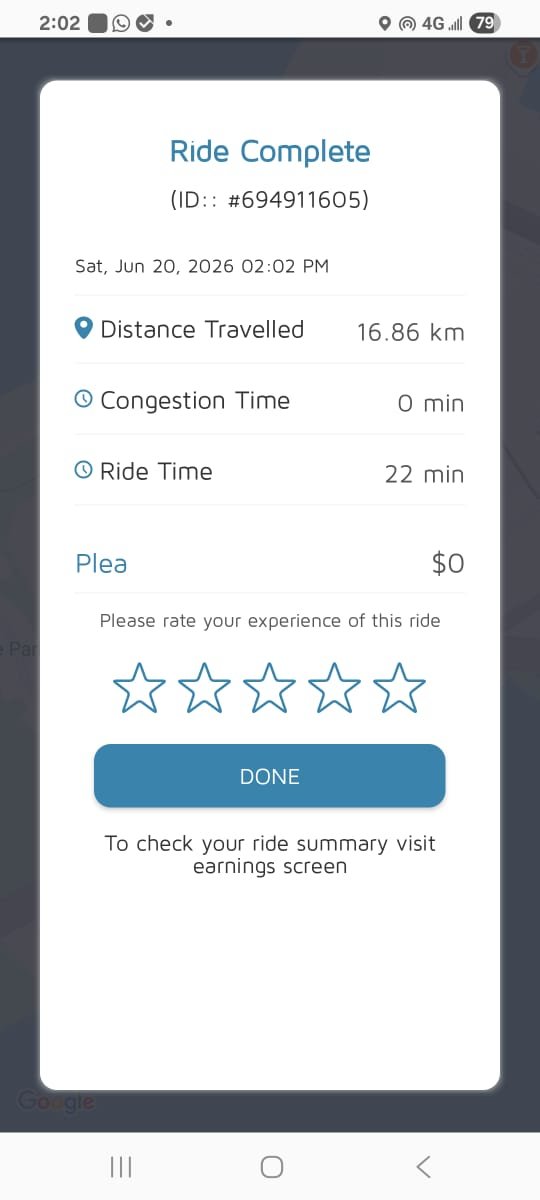
Payment already went through online. You don't need to collect anything from the passenger.
- Collect the fare in cash from the passenger, or
- Use our backup payment link: pay.arubataxiapp.com to charge them by card yourself.
- Rate your passenger using the stars before tapping Done.
7Wallet
Where you check your current balance and past transactions.
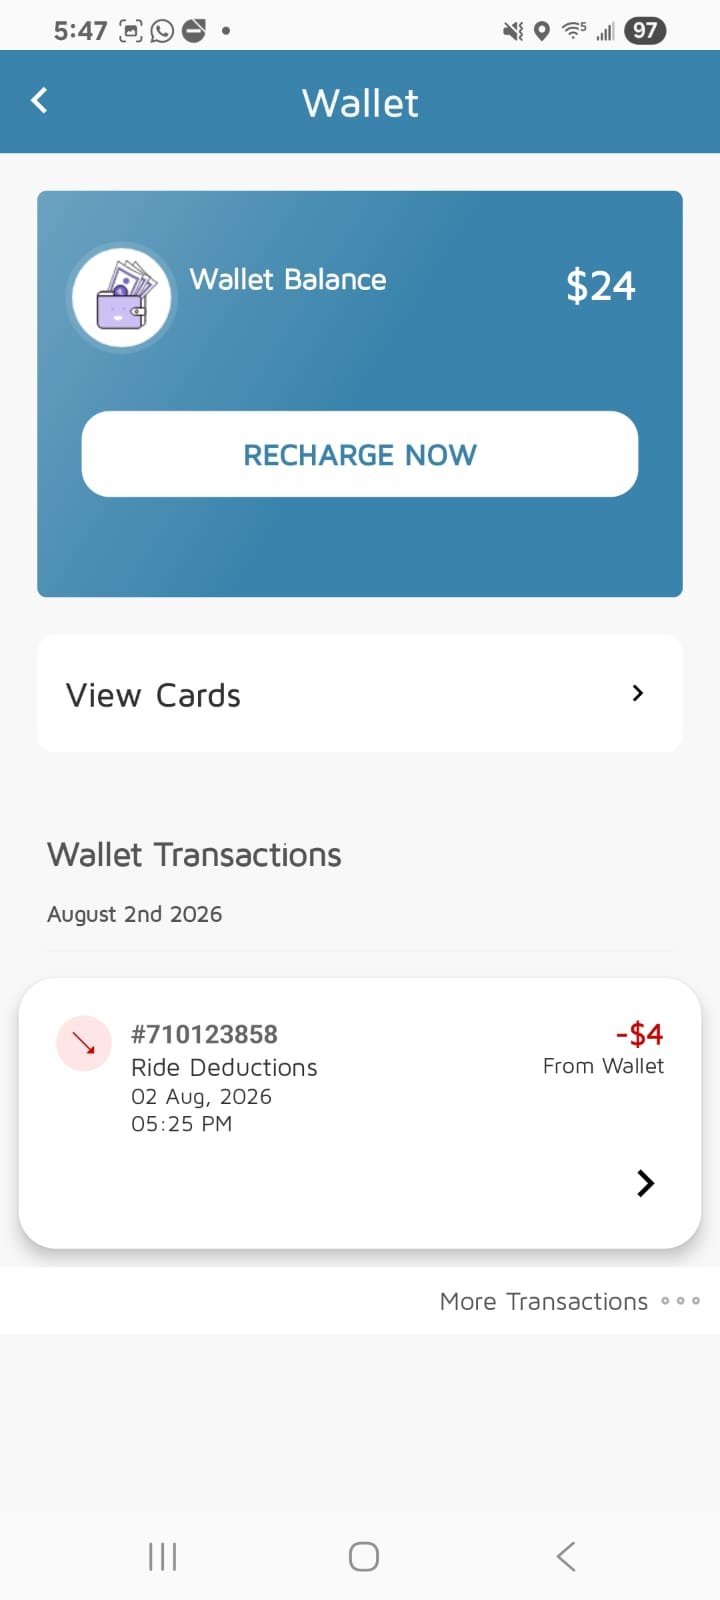 Wallet balance
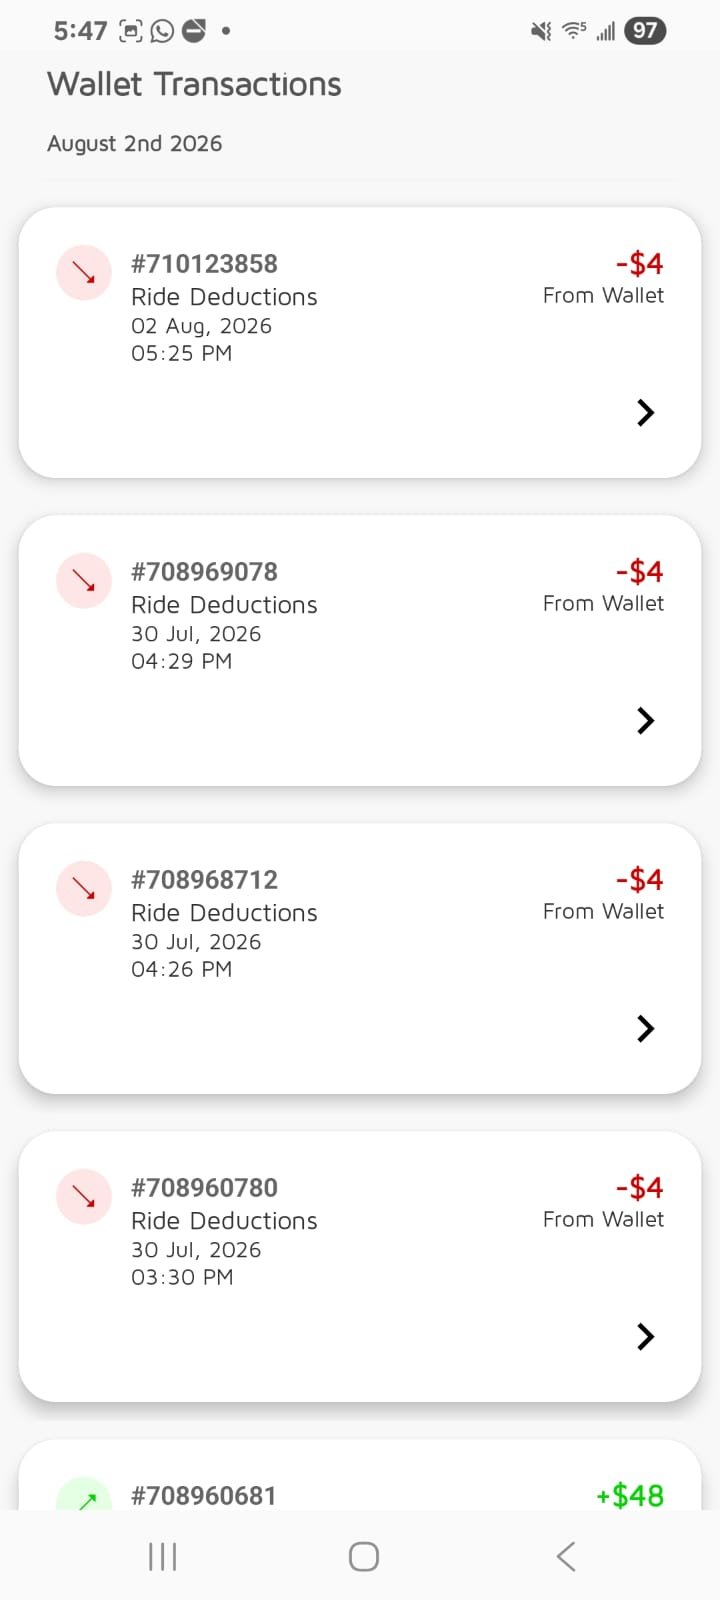 Wallet transactions
- Open the menu → Wallet to see your current balance.
- Tap into Wallet Transactions to see a list of amounts added or deducted, with dates and ride numbers.
8Earnings
Where you check what you've made today, this week, and per ride.
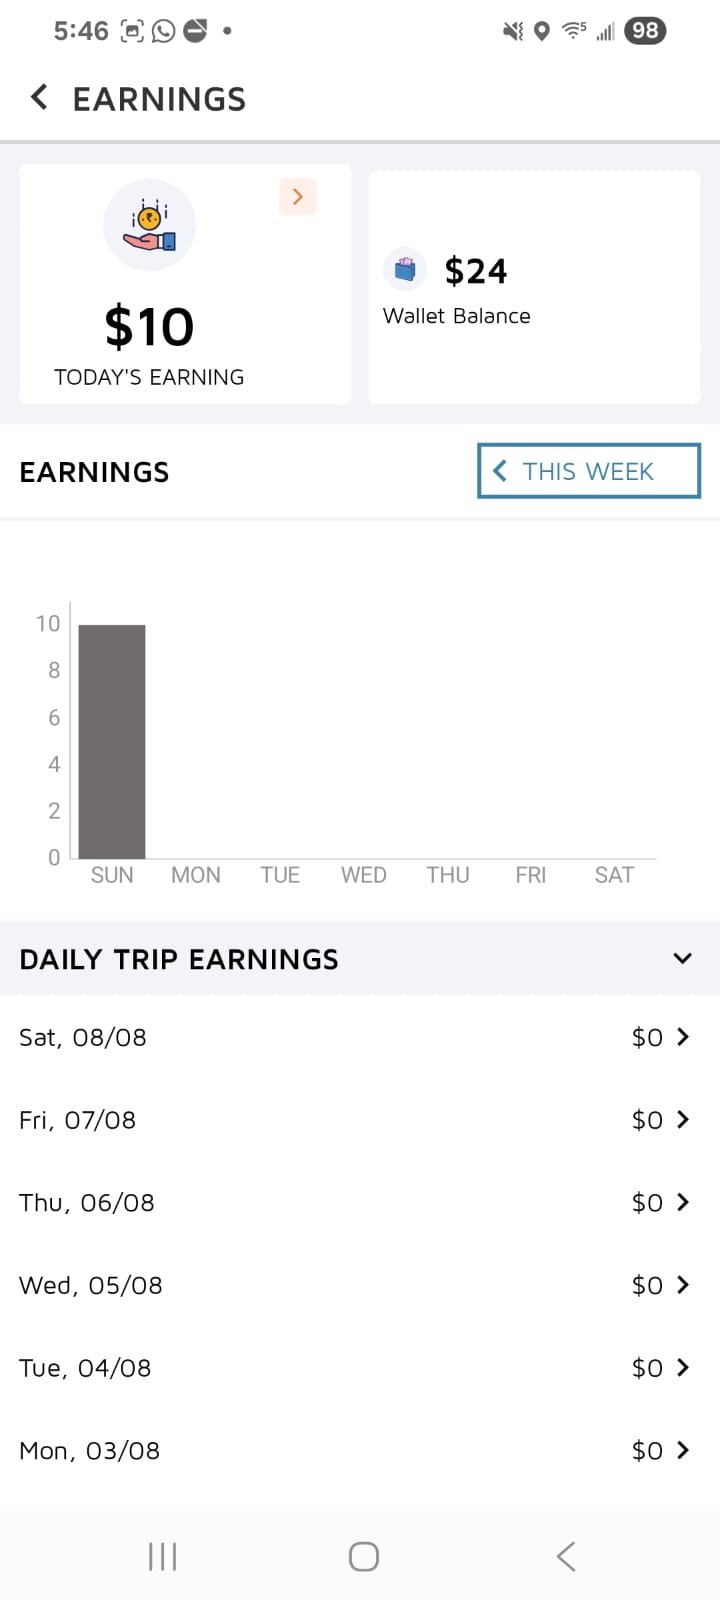 Earnings overview
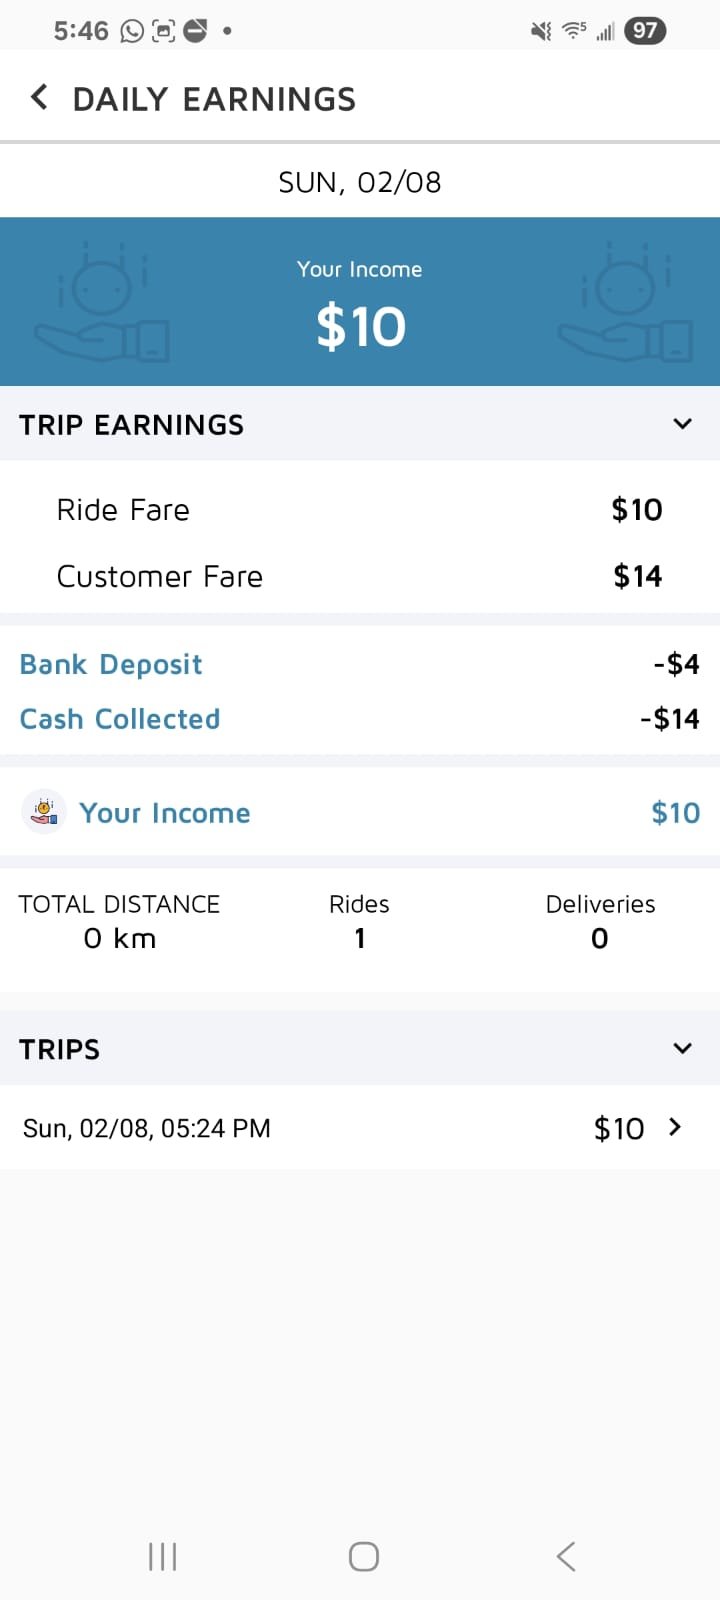 Daily breakdown
- Open the menu → Earnings to see today's total, your wallet balance, and a chart of the past week.
- Tap on any day to see a breakdown of that day's rides, or tap into a single ride for its trip details.
9Profile & Service Type
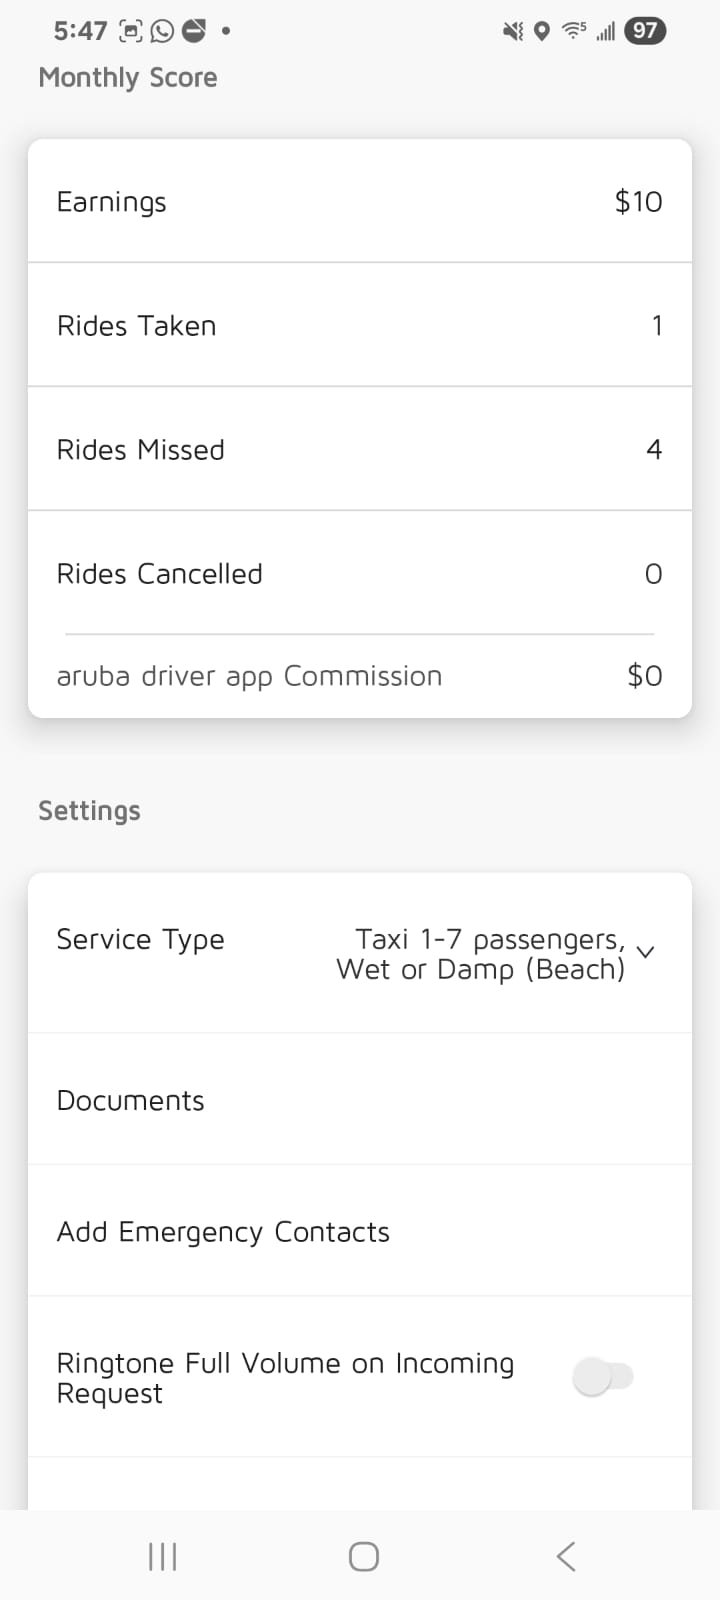 Profile — Monthly Score & Settings
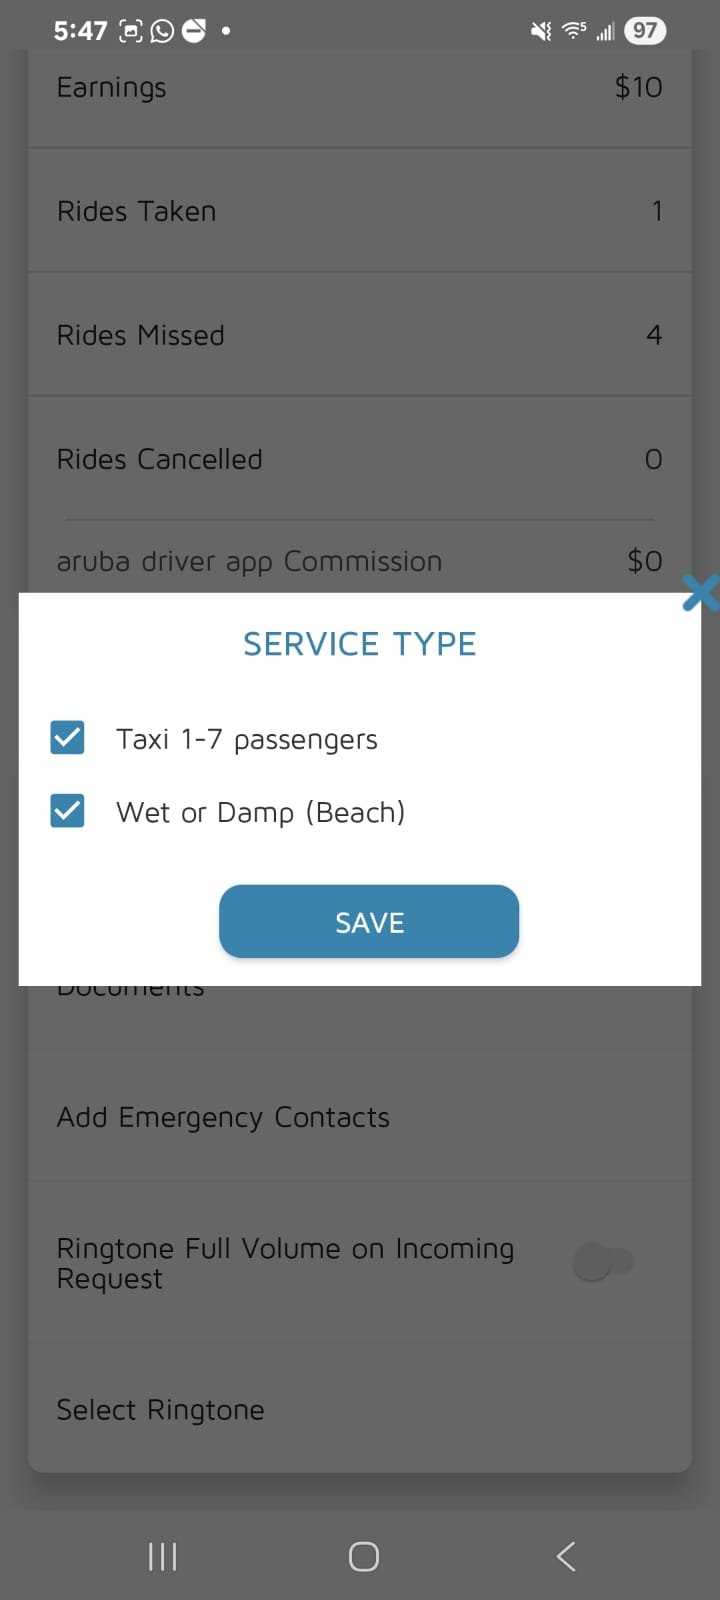 Service Type
- Open the menu → your name/photo at the top to see your Profile: rating, monthly earnings, rides taken/missed/cancelled.
- "Ringtone Full Volume on Incoming Request" — when this is ON, the ride request sound plays at full volume even if your phone is on silent or turned down. Toggle it on or off here depending on what you prefer.
- Under Service Type, make sure the correct box(es) are checked for the type of trips you can take (e.g. Taxi 1-7 Passengers, Wet or Damp/Beach), then tap Save.
10Scheduled Rides
Rides booked in advance work a little differently from normal live requests.
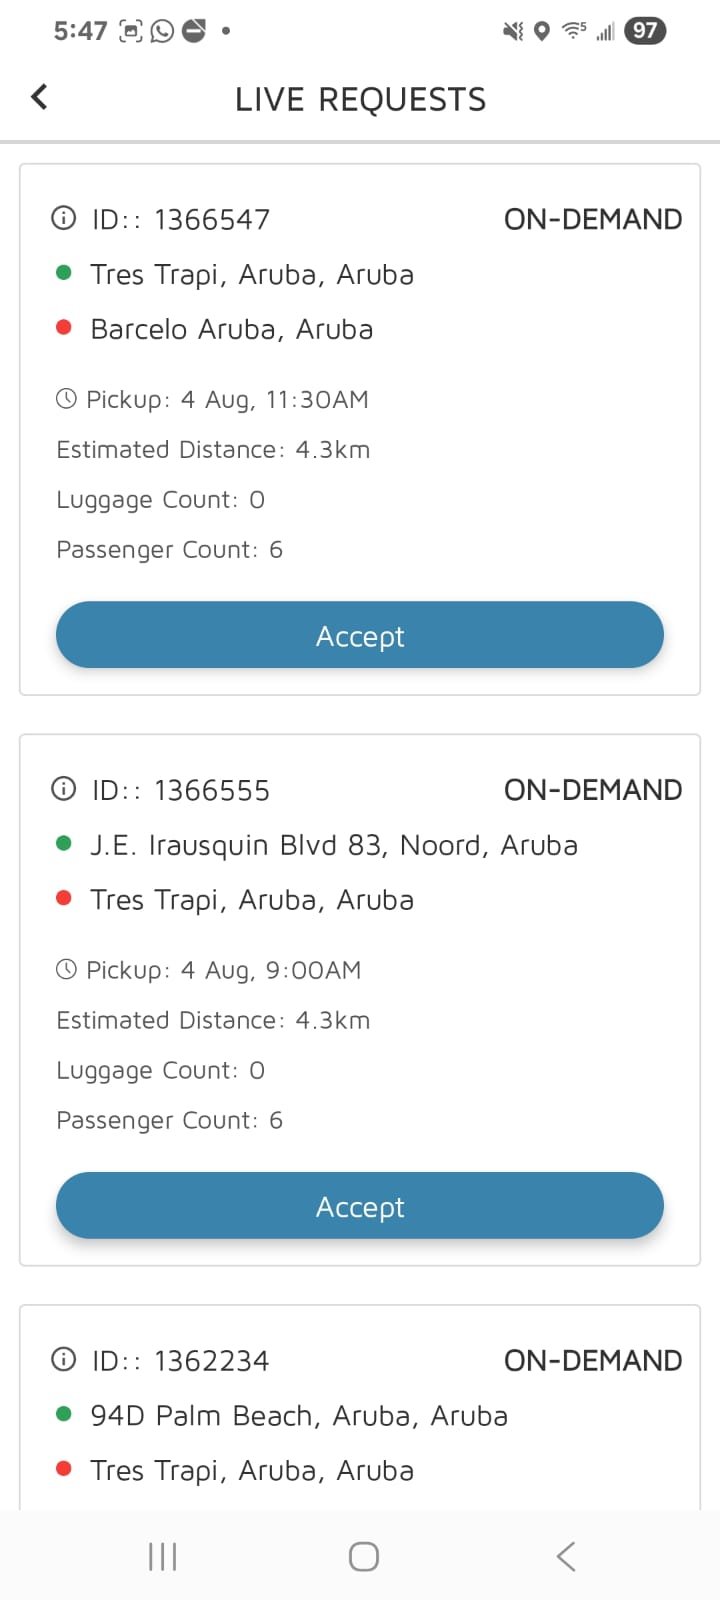 Live Requests — scheduled rides
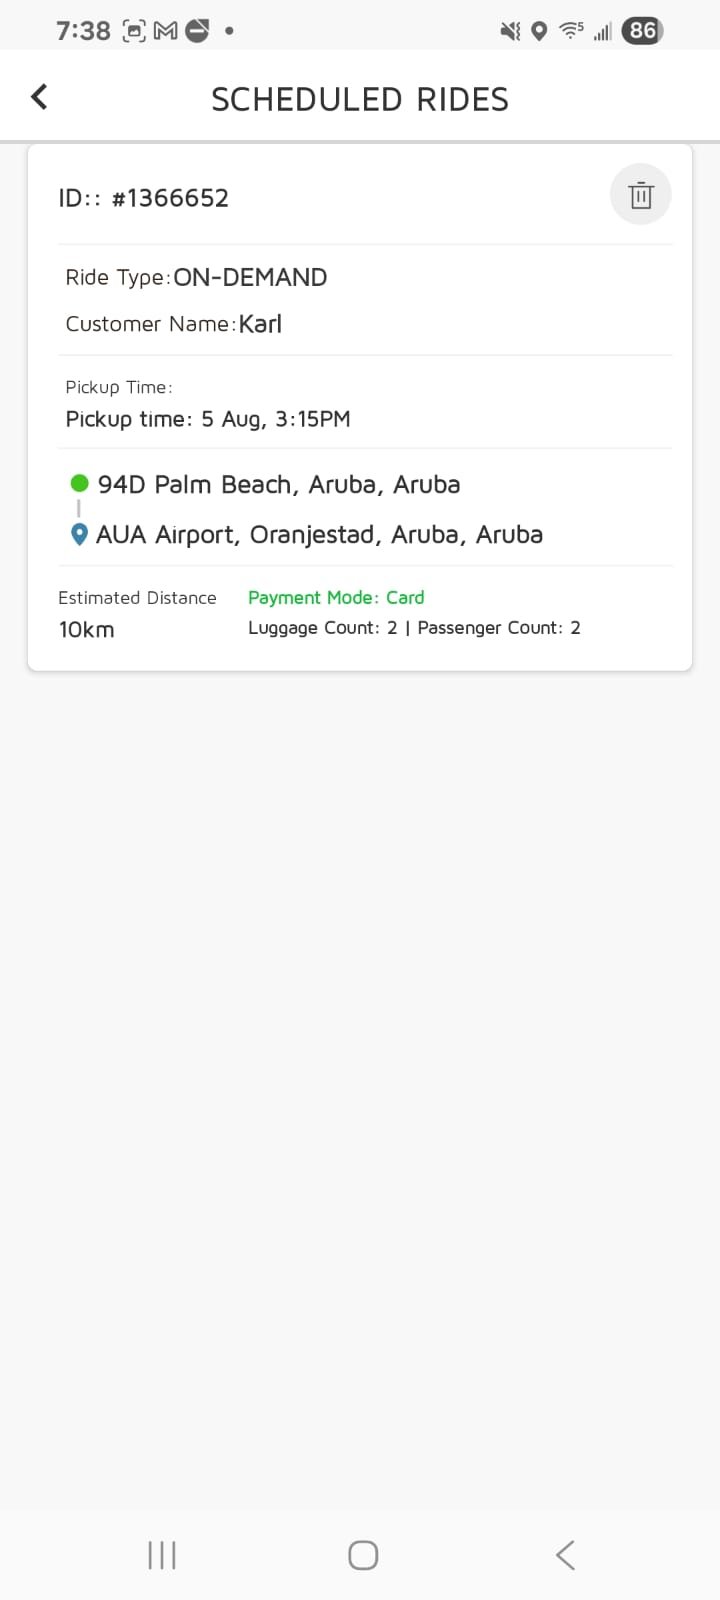 Scheduled Rides tab — after accepting
- Open the menu → Live Requests to see upcoming pre-booked trips, each showing a pickup time, pickup/drop locations, passenger and luggage count.
- Tap Accept on any trip you want to take.
- Once accepted, it moves to your Scheduled Rides tab — that's where you'll find it later, with a trash/bin icon in the top right to cancel it if needed.
- The actual ride request will only pop up on your screen 15 minutes before the scheduled pickup time — you don't need to do anything until then.
💳Backup Payment — pay.arubataxiapp.com
Use this if a passenger's online payment fails and the app still shows "Take Cash" / "Please Collect Cash".
- Only use this if a passenger's online payment has failed.
- On your own phone, go to pay.arubataxiapp.com
- Enter your email.
- Enter your PIN — if you don't have one, request it from Javier or Gerrick.
- Tap Continue.
- Enter the last 4 digits of the ride/trip ID. You'll find this in the app under Daily Earnings → Trip Details.
- Enter the fare you're charging — the system automatically adds the $4 convenience fee on top.
- Tap Generate QR Code and let the passenger scan it — they complete the payment on their own phone.